.avif)
.avif)
Table of contents
- Twilio integration
- SendGrid integration
- Using emoji in select column type
- Optional tag for form questions
Twilio integration
We’re excited to announce our latest integration with Twilio! You can now send bulk SMS directly from Retable, making automated communication easier than ever. Let's see how it works! 👇🏻
- Access your project: Start by opening the Retable project that contains the phone numbers of the people you want to send SMS to.
- Go to automations: In the top right corner of your project, navigate to the "Automations" section.
- Create a new automation: Click on "Add New" to create a new automation.
- Name your automation: Give your automation a name in the "Name" field.
- Set your trigger: Select your trigger type for when the automation should start.
- Choose your table: Select the table from which you want to send the SMS.
- Select "Send SMS with Twilio" as action: Choose "Send SMS with Twilio" as the action type for your automation.
- Create a Twilio connection: Click the "New connection" button to create your Twilio connection.
- Name your connection: Provide a name for your connection. Optionally, you can add a description.
- Enter Twilio account details:
- In the 'Account SID' field, enter your Twilio Account SID.
- In the 'Auth Token' field, enter your Twilio Auth Token.
- You can use the same SID and Auth Token for multiple automations.
- Save your connection: Click the ‘Save’ button to store your Twilio connection. You can create multiple connections if needed. Please note:
- Connections are user-specific, meaning other users in the project can’t edit your connections.
- You can see and use connections added by other users if they are selected for an automation, but you can’t see unselected connections from other users.
- Automatic phone number assignment: After clicking save, your Twilio-registered phone number will be automatically added to the **From** field of your automation. All SMS sent through this automation will be sent from your Twilio phone number.
- Specify recipients (To field):
- If you have a "Phone Number" column in your table, you can use curly brackets `{}` to add the column name in the 'To' field. Example: `{Phone Number}`.
- This will ensure SMS is sent to the phone numbers in that column whenever the trigger is activated.
- Alternatively, you can manually enter a phone number in the 'To' field if you want to send SMS to the same number each time. To enter multiple numbers, separate them with commas.
- Write your SMS content: In the ‘Content’ field, type the SMS you want to send. If you wish to pull data from a column in your table, use curly brackets `{}` to reference the column name.
- For example, if you want each SMS to include the recipient’s name and your table has a "Name" column, you can write `{Name}` in the content field. The SMS will then include the person’s name in the message.
Now your automation is set up, and your SMS will be sent automatically based on your selected trigger!
SendGrid integration
We’re super excited to introduce our latest integration with SendGrid, bringing you powerful email automation directly within Retable! 🎉
With this new feature, you can now easily send personalized emails from your Retable projects, streamlining your communication workflows and reaching your audience effortlessly. Whether it's promotional campaigns, updates, or automated notifications, our SendGrid integration allows you to manage your email communication without leaving Retable.
- Access your project: Open the Retable project that contains the email addresses of the people you want to send emails to.
- Go to automations: In the top right corner of your project, navigate to the "Automations" section.
- Create a new automation: Click on "Add New" to create your new automation.
- Name your automation: Provide a name for your automation in the "Name" field.
- Set your trigger: Select the type of trigger that will activate the automation.
- Choose your table: Select the table that contains the email information you’ll be using.
- Select "Send email with SendGrid" as action: Choose "Send Email with SendGrid" as the action type.
- Create a SendGrid connection: Click on the "New connection" button to create your SendGrid connection.
- Name your connection: Give your connection a name. Optionally, you can add a description.
- Enter SendGrid API Key:
- In the API Key field, enter your SendGrid API key.
- You can use the same API key for multiple automations.
- Save your connection: Click the ‘Save’ button to store your SendGrid connection. You can add multiple connections if needed. Please note:
- Connections are user-specific, meaning other users in the project can’t edit your connections.
- You can see and use connections added by others if they are selected for an automation, but you can’t see or edit connections not selected by other users.
- Select your "From" email address: After saving, the email addresses registered with your SendGrid account will automatically be listed in the **From** field of your automation. Select the email address you want to send your emails from.
- Specify recipients (To field):
- If your table has an "E-mail" column, you can use curly brackets `{}` to reference the column name in the ‘To’ field. Example: `{E-mail}`.
- This ensures that emails are sent to the email addresses in that column when the trigger is activated.
- Alternatively, you can manually enter email addresses in the ‘To’ field if you want to send emails to the same recipients each time. To send emails to multiple addresses, separate them with commas.
- Write your email content: In the ‘Content’ field, write the email message you want to send. If you wish to pull data from a specific column, use curly brackets `{}` to reference the column name.
- For example, if you want each email to include the recipient’s name and your table has a "Name" column, you can write `{Name}` in the content field. This will automatically personalize the emails with each recipient’s name.
- Use a dynamic template (Optional): You can also activate the ‘Use Template’ button to select one of the dynamic templates available in your SendGrid account. If you wish to pull data from a specific column, use curly brackets `{}` to reference the column name.
- For example, if your SendGrid template has a variable called "userName" and you want to dynamically pull the "Name" values from your Retable table, after selecting your SendGrid template using the "Use template" option, simply enter "userName" in the Name field for the SendGrid variable and add your Retable column name in the Value field, using curly brackets like this: {Name}.
- Additionally, you can assign fixed values to variables defined in SendGrid directly from Retable. Instead of dynamically pulling data from your Retable columns, you can set a constant value. For example, if you have a variable named "couponCode" in SendGrid, you can enter "couponCode" in the Name field and input a fixed coupon code value in the Value field. When doing this, you should not use curly brackets.
Now your automation is set up! When the selected trigger is activated, your email will be sent automatically through SendGrid.
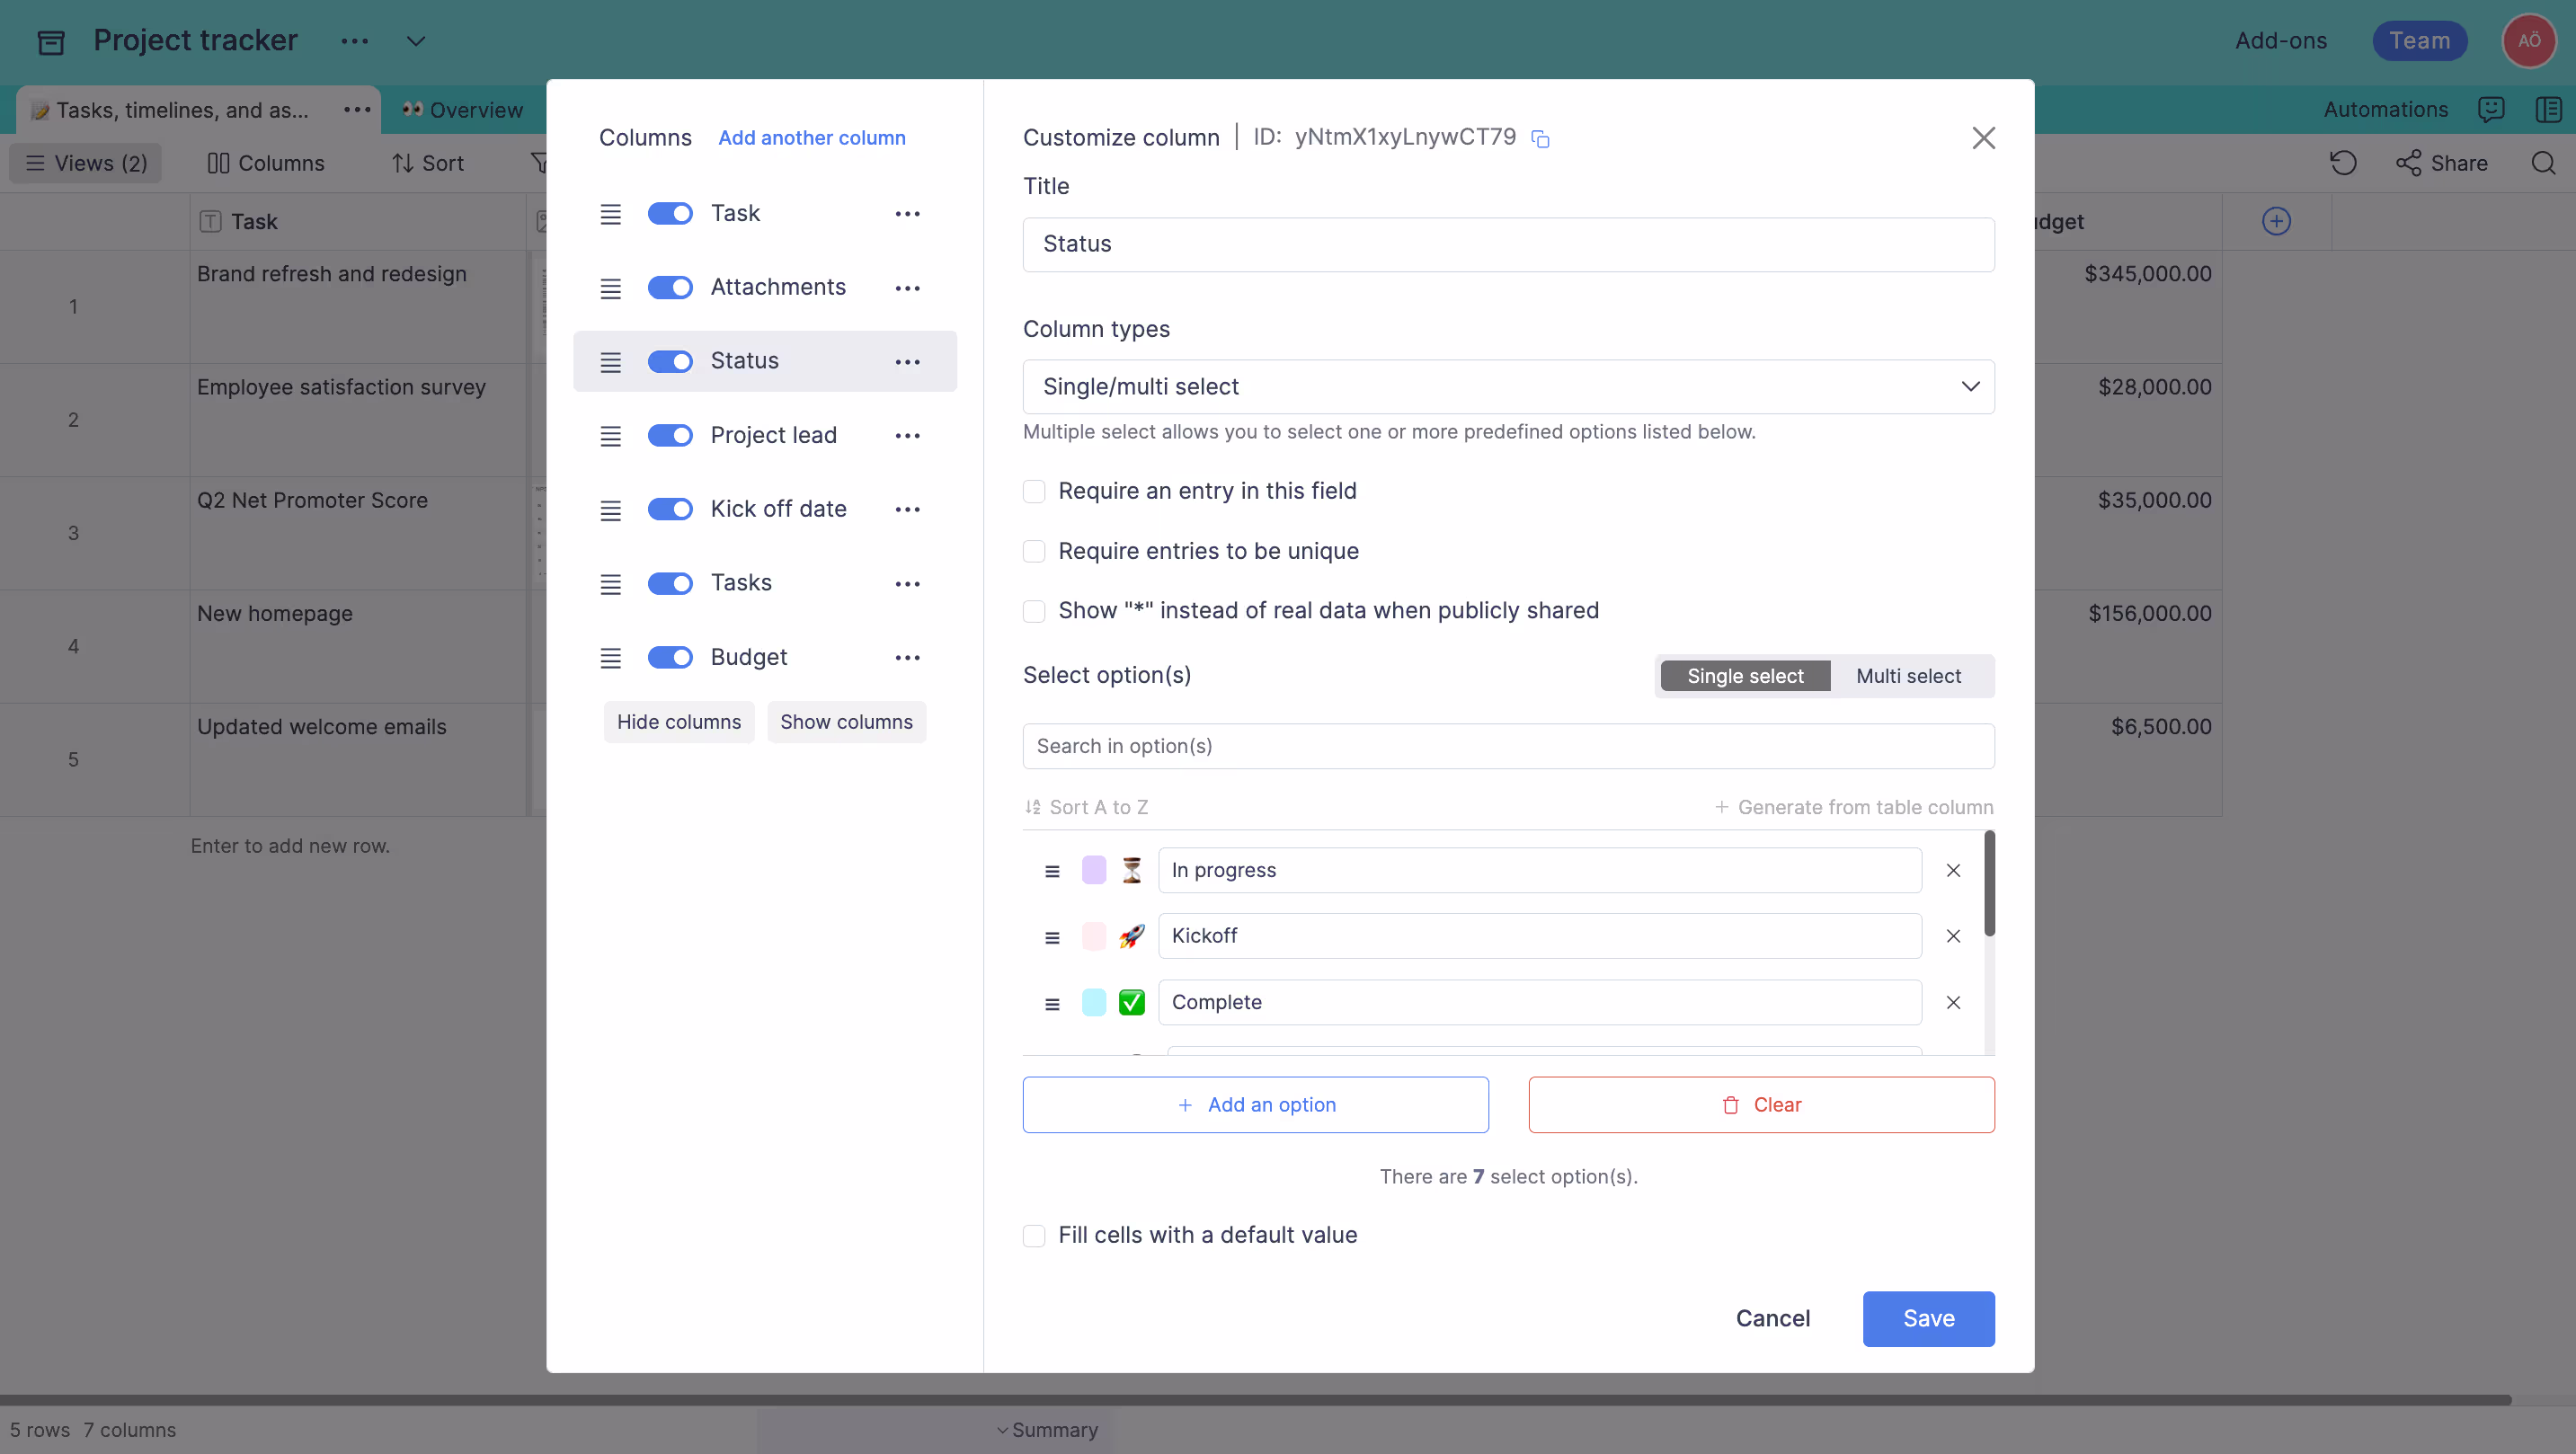
Using emoji in select column type
Our new feature allows you to easily select emojis for the options you create in the Retable select column type. This makes your select options more visually engaging in your tables. Simply click the emoji icon on the left of the option creation field to choose an emoji!
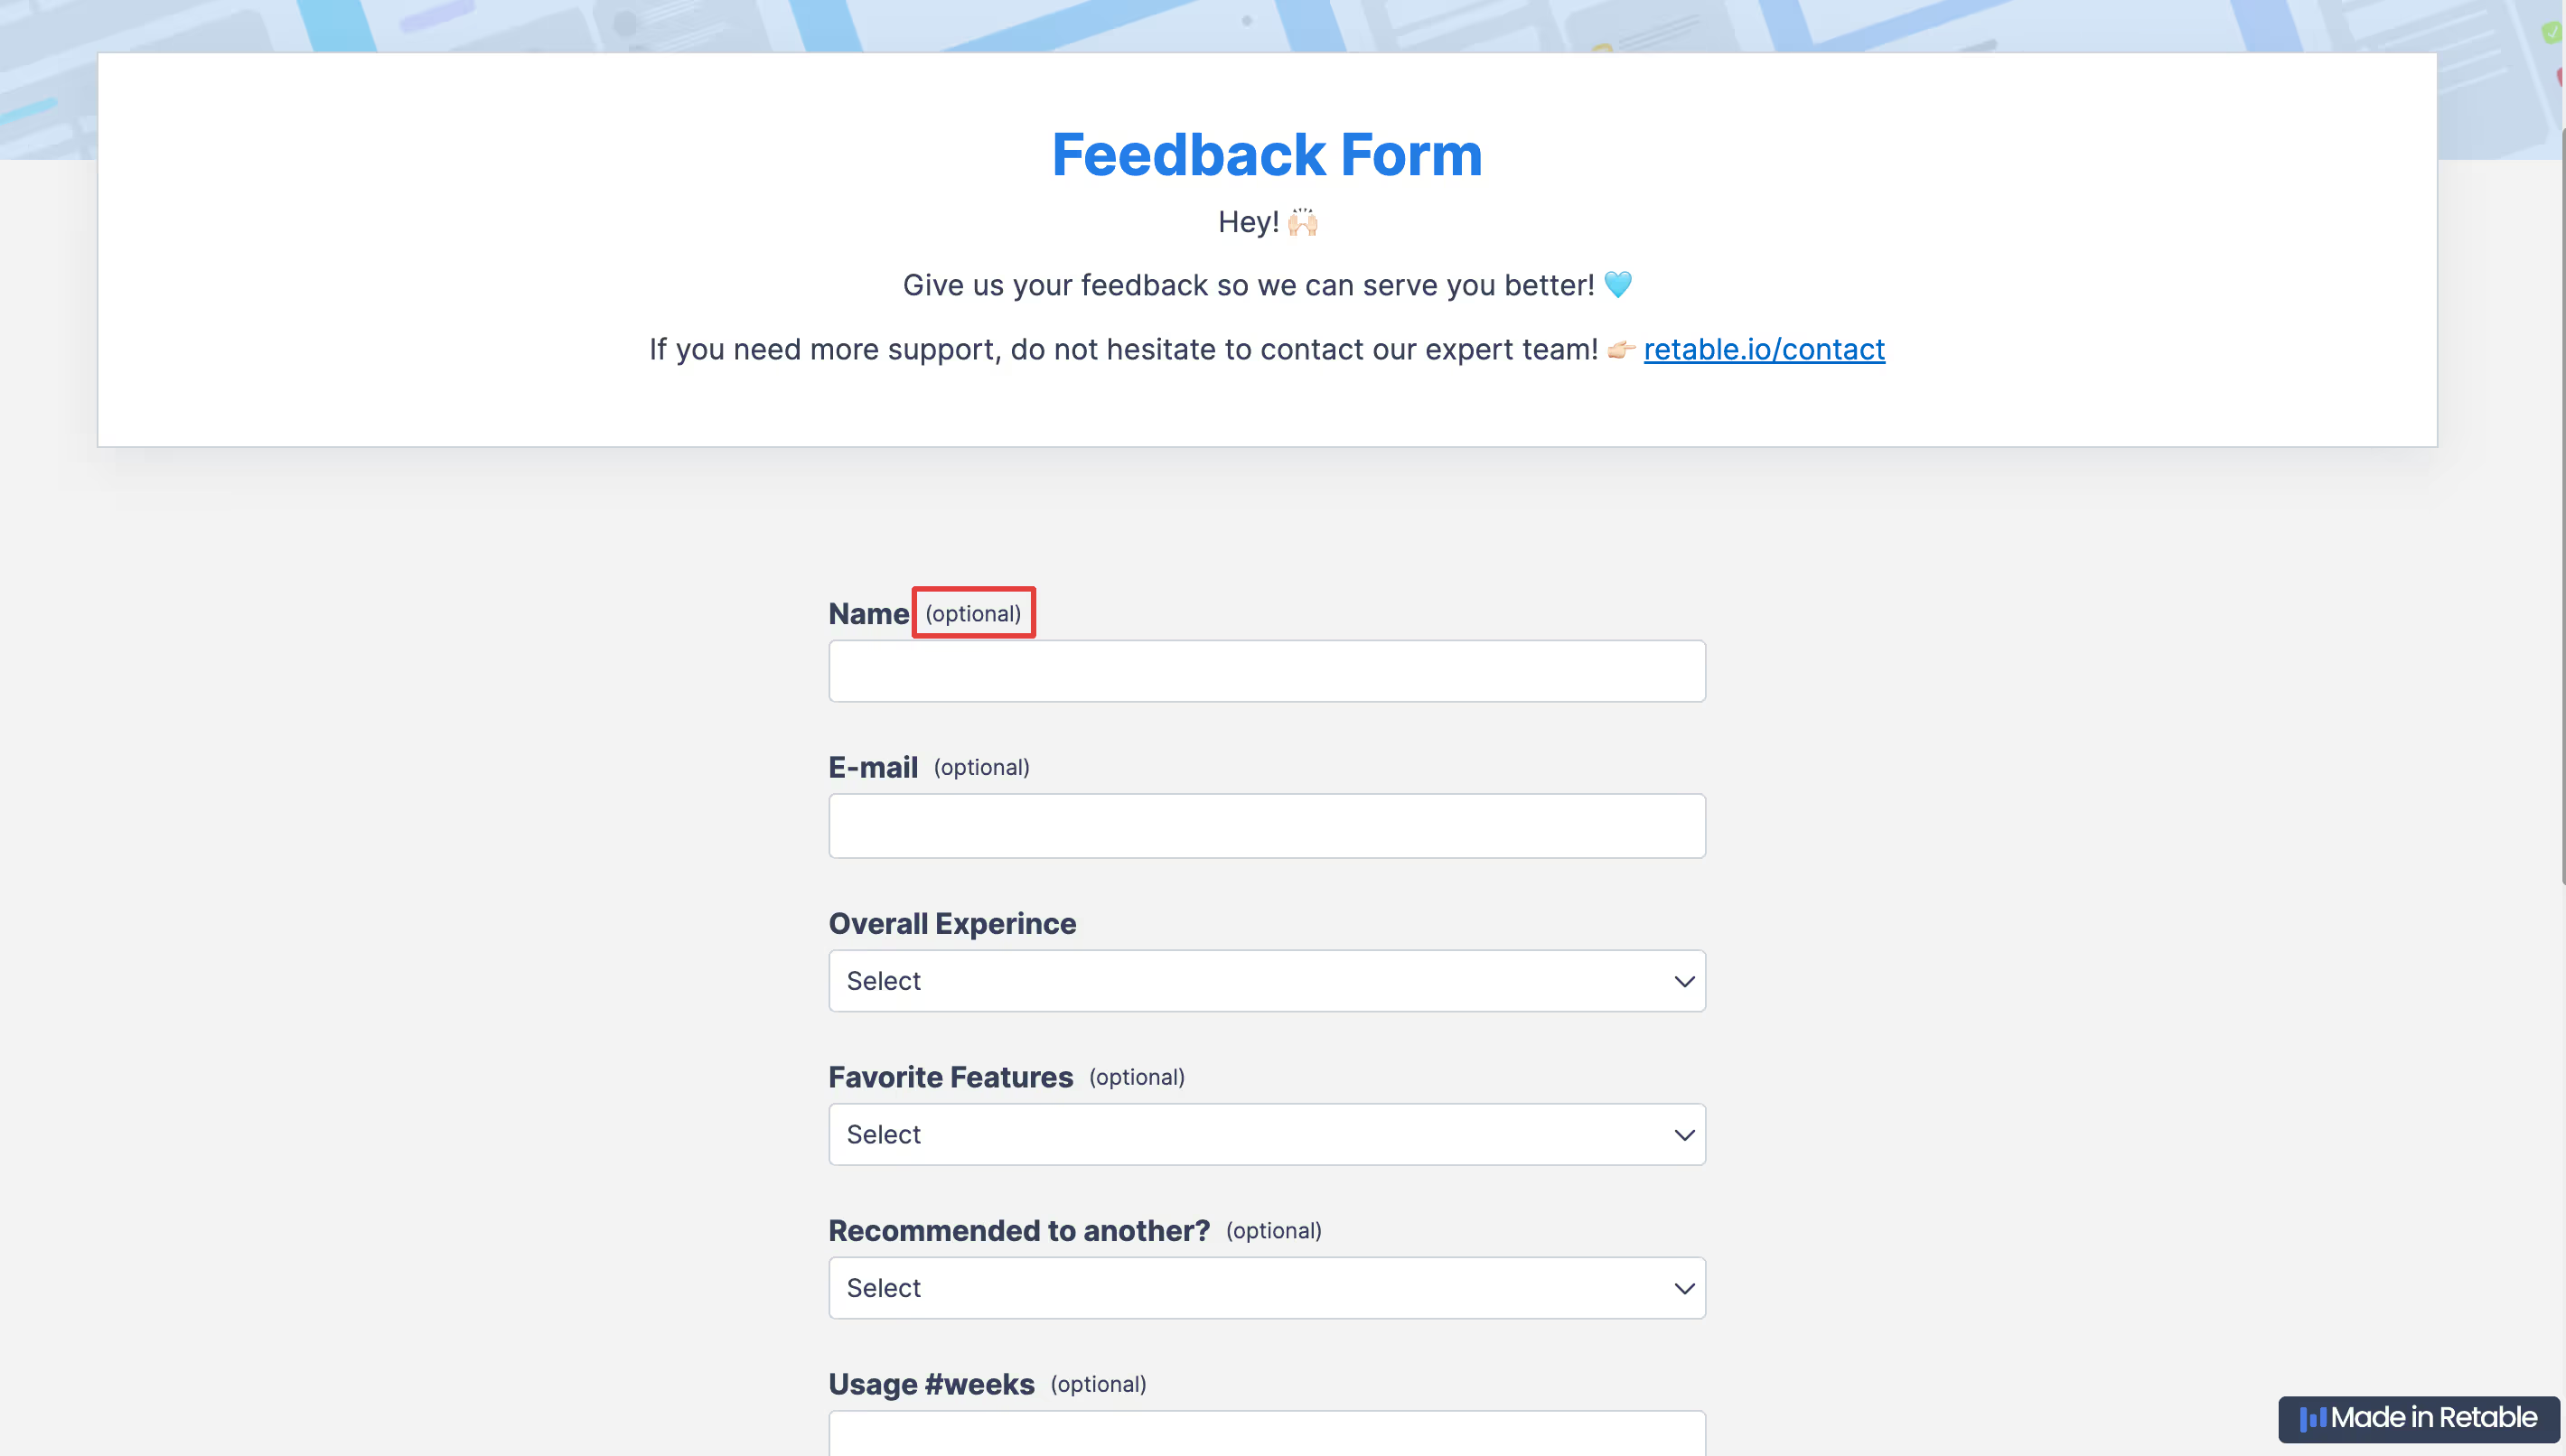
Optional tag for form questions
With this update, questions in your Retable forms that are not tagged as 'required' will now be labeled as 'optional.' This allows users to easily see which fields are optional while focusing more easily on filling out the mandatory fields. Questions marked as required will not have any tags.
If you're curious about the previous product updates check them out below! 👇🏻
more
Related Resources
.png)

.avif)
Create your smart data management solution
Plan, track, and analyse with your ease. Transform your data with an all-in-one platform, collaborate with your teammates.
Try for free!