What's new in Retable - January 2023
Hello everyone, We’re excited about announcing Retable’s new product updates for the first month of 2023! We have published Retable's January developments. Discover our new formatting options to re-color your spreadsheet, enjoy the new sharing options and much more even we can not imagine
It's been a busy month for us, but we're excited to announce that our new updates are finally here! We've put a lot of effort into making them even more user-friendly and intuitive by incorporating new user-friendly and easy-to-use features. Plus, we've added a host of new features, such as column formatting and a table history area.
These updates are now available for all of our users to take advantage of. 🎉 We're really curious about your feedback about our new features. Try out the new features and enhancements and let us know what you think. We're always looking for ways to improve our products and make your experience even better.
We can't wait for you to check out these new updates! Let's explore them together and see how they can make your work easier and more efficient. 🚀
- Column Formatting
- Expand & Collapse Your Groups
- "Use Data" Option for Project Sharing
- Customize Row Size
- Formatting for Calendar Records
- Table History Area
- View-Specific Sharing Permissions
- Data Replacing Option in File Import
- Changing the Email Associated with a Retable Account
Column Formatting
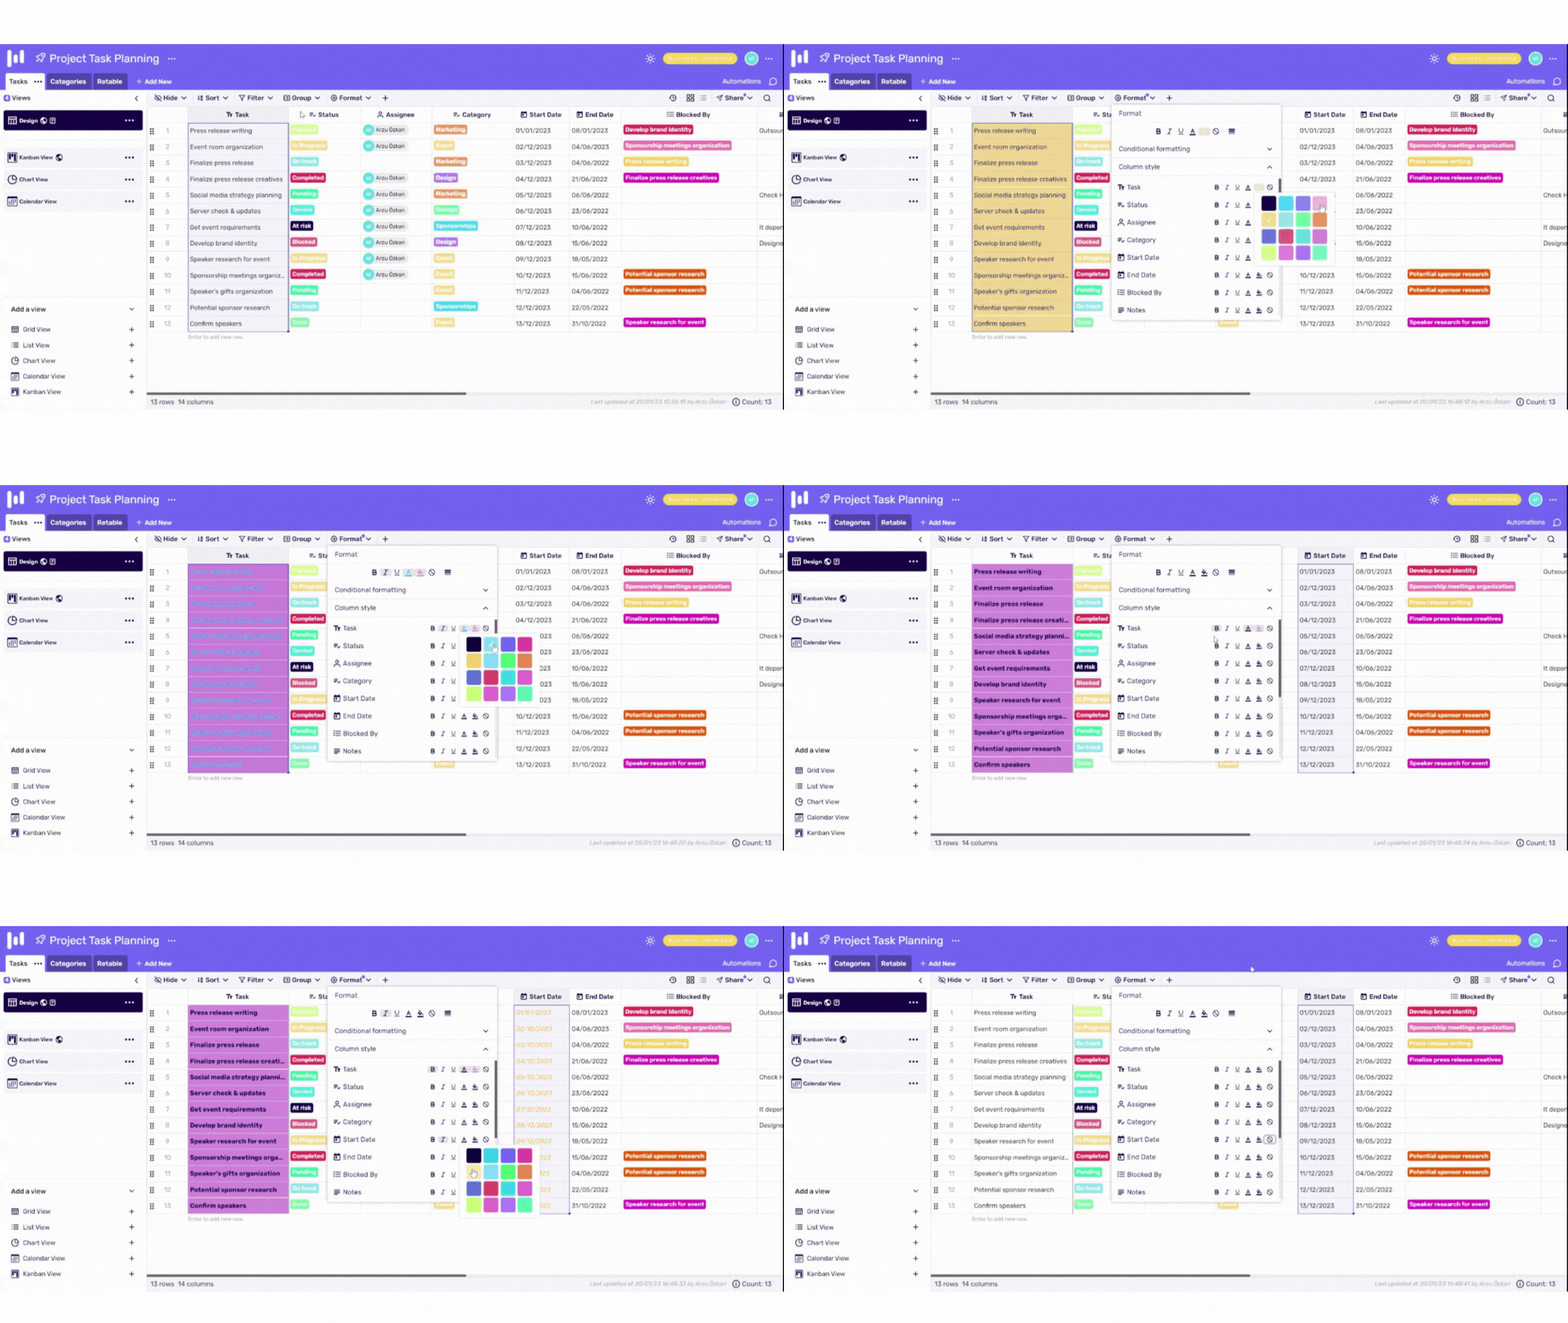
Now you can customize your tables with Retable's advanced formatting options. With the special formats that you can apply to your columns, you can easily see your columns more colorful, more highlighted or more striking. So, you don't need to reformat your cells every time you add new data. Any formatting you make for your column is automatically applied to all data in this column.
Let's see how it works! 👇🏻
- Click on the "Format" button from the toolbar
- Open the "Column Style" field
- Apply any of the formats on the right side to the column you want from the column list.
Expand & Collapse Your Groups
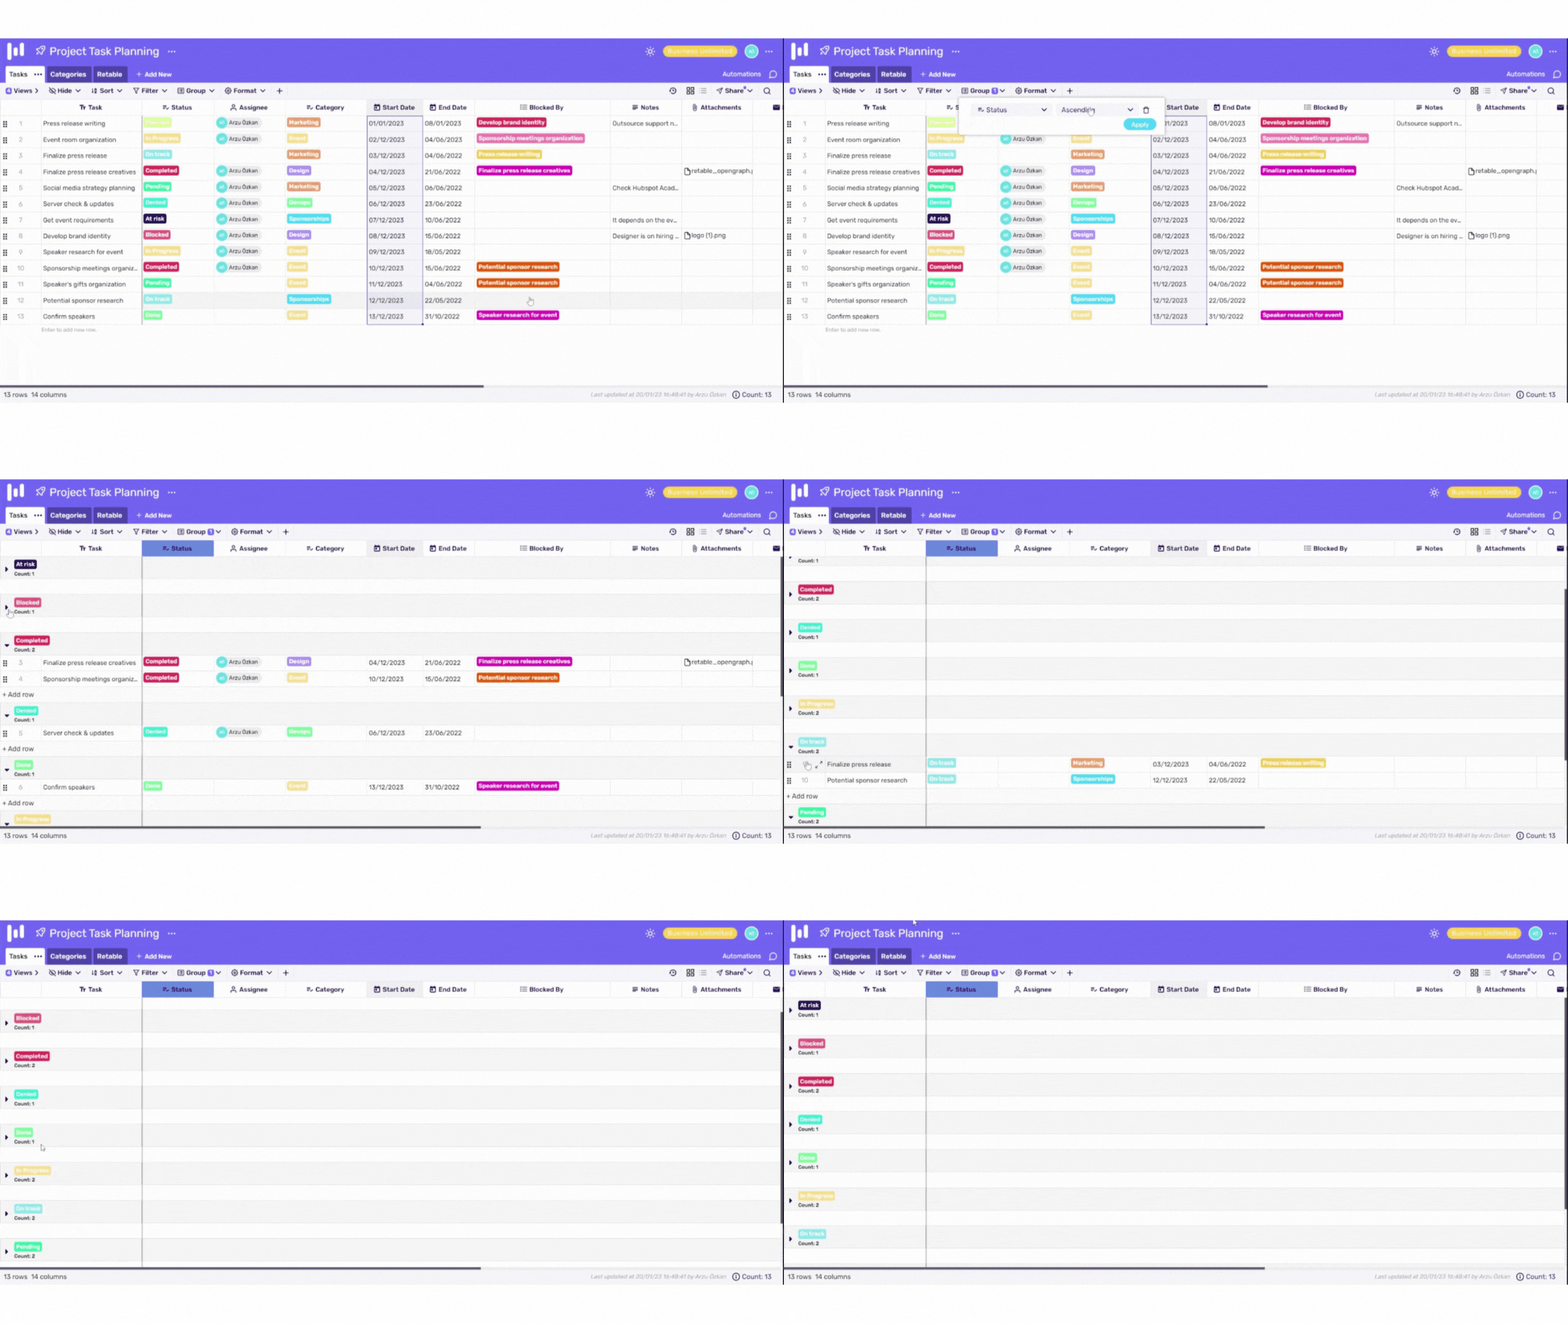
Retable's grouping feature is now more streamlined. Now you can view the groups in your tables more compactly with the expand and collapse structure. So, you can instantly view only the data you want to see.
Let's see how it works! 👇🏻
- Click on the "Grouping" button on the toolbar
- Apply a group to your table by picking a column to group
- Now, you can expand or collapse your groups by clicking the arrow near your group names.
"Use Data" Option for Project Sharing
If you enable the "Use Data" toggle while sharing your Retable tables, you know that the people you share your tables with can copy these tables to their Retable dashboards. Now, this feature is active for all your Retable projects!
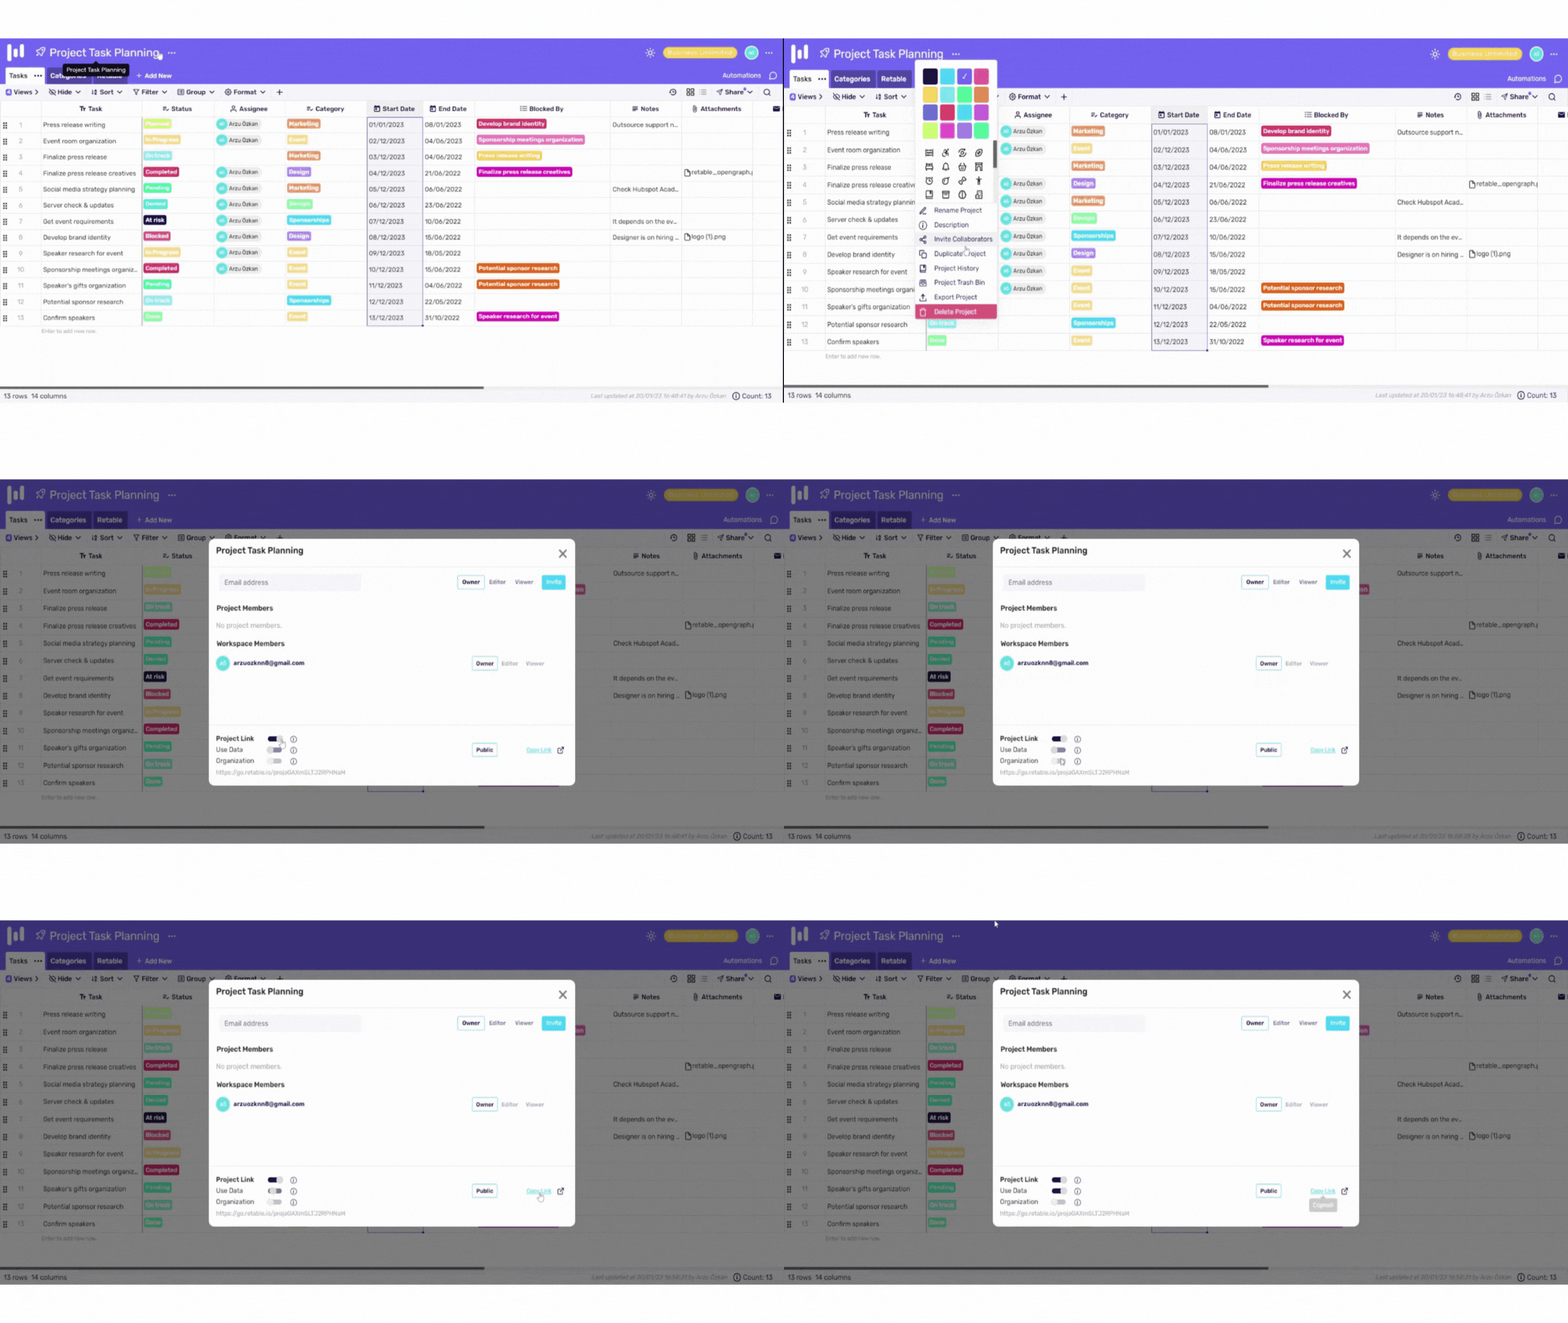
If you share your Retable projects by activating the "Use Data" option, the people you share can easily copy all the tables and views in your project to their Retable dashboard and use this project as a template for themselves without making any changes to your data.
Let's see how it works! 👇🏻
- Click the 3 dots near your project name
- Select the "Invite Collaborators" option
- Activate the "Project Link" toggle
- Then, activate the "Use Data" toggle
- Now, you can copy the project link to share it.
Customize Row Size
Here we are with one of the most effective developments of January! Now, when you customize the row sizes of your Retable tables, your data will expand or narrow in accordance with these row sizes at the same ratio. It's hard to explain, but let's show you it quickly! 👇🏻

Formatting for Calendar Records
Now you can apply any color or various formats to your data when viewing them in calendar view. In this way, you can quickly view the data that is important to you on the calendar at a glance.
Let's see how it works! 👇🏻
- Create a “Calendar View”
- Click the “Customize List” button on the toolbar
- Apply any of the formats on the right side to the column you want from the column list.
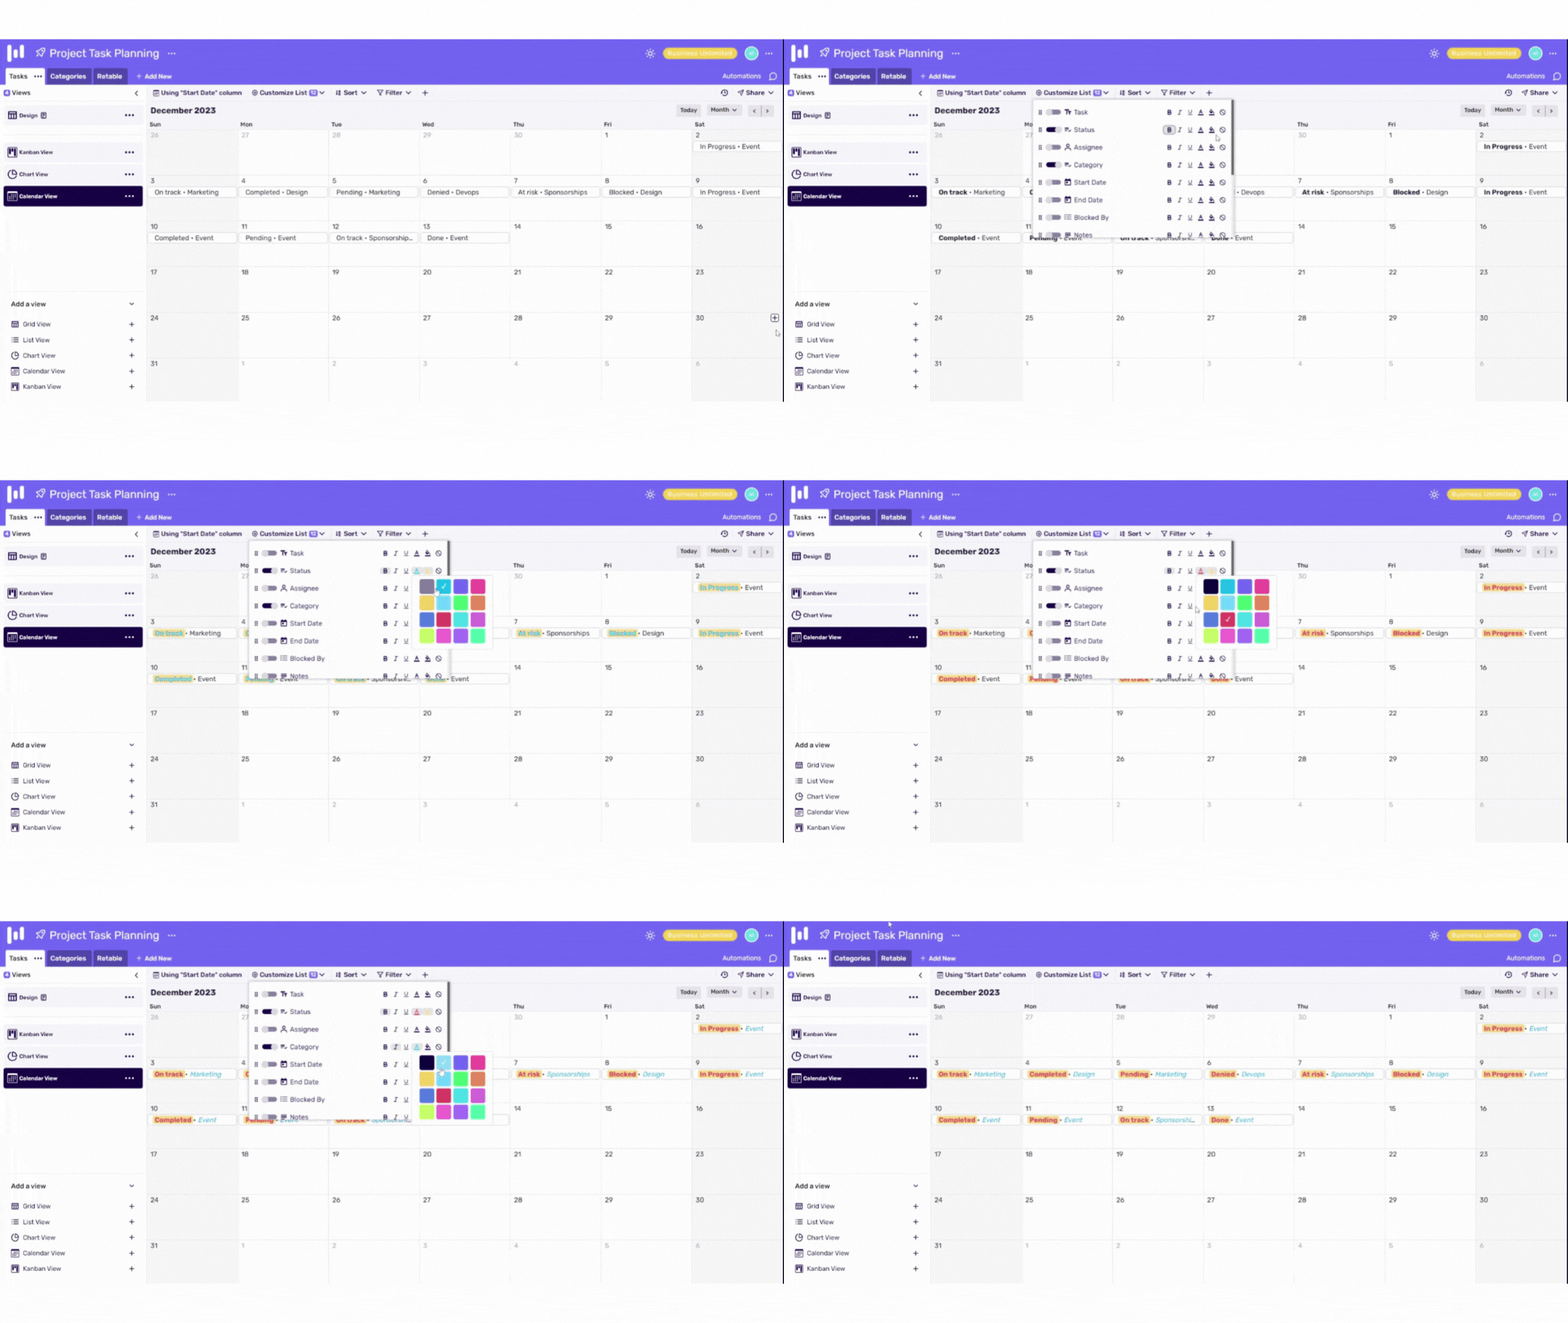
Table History Area
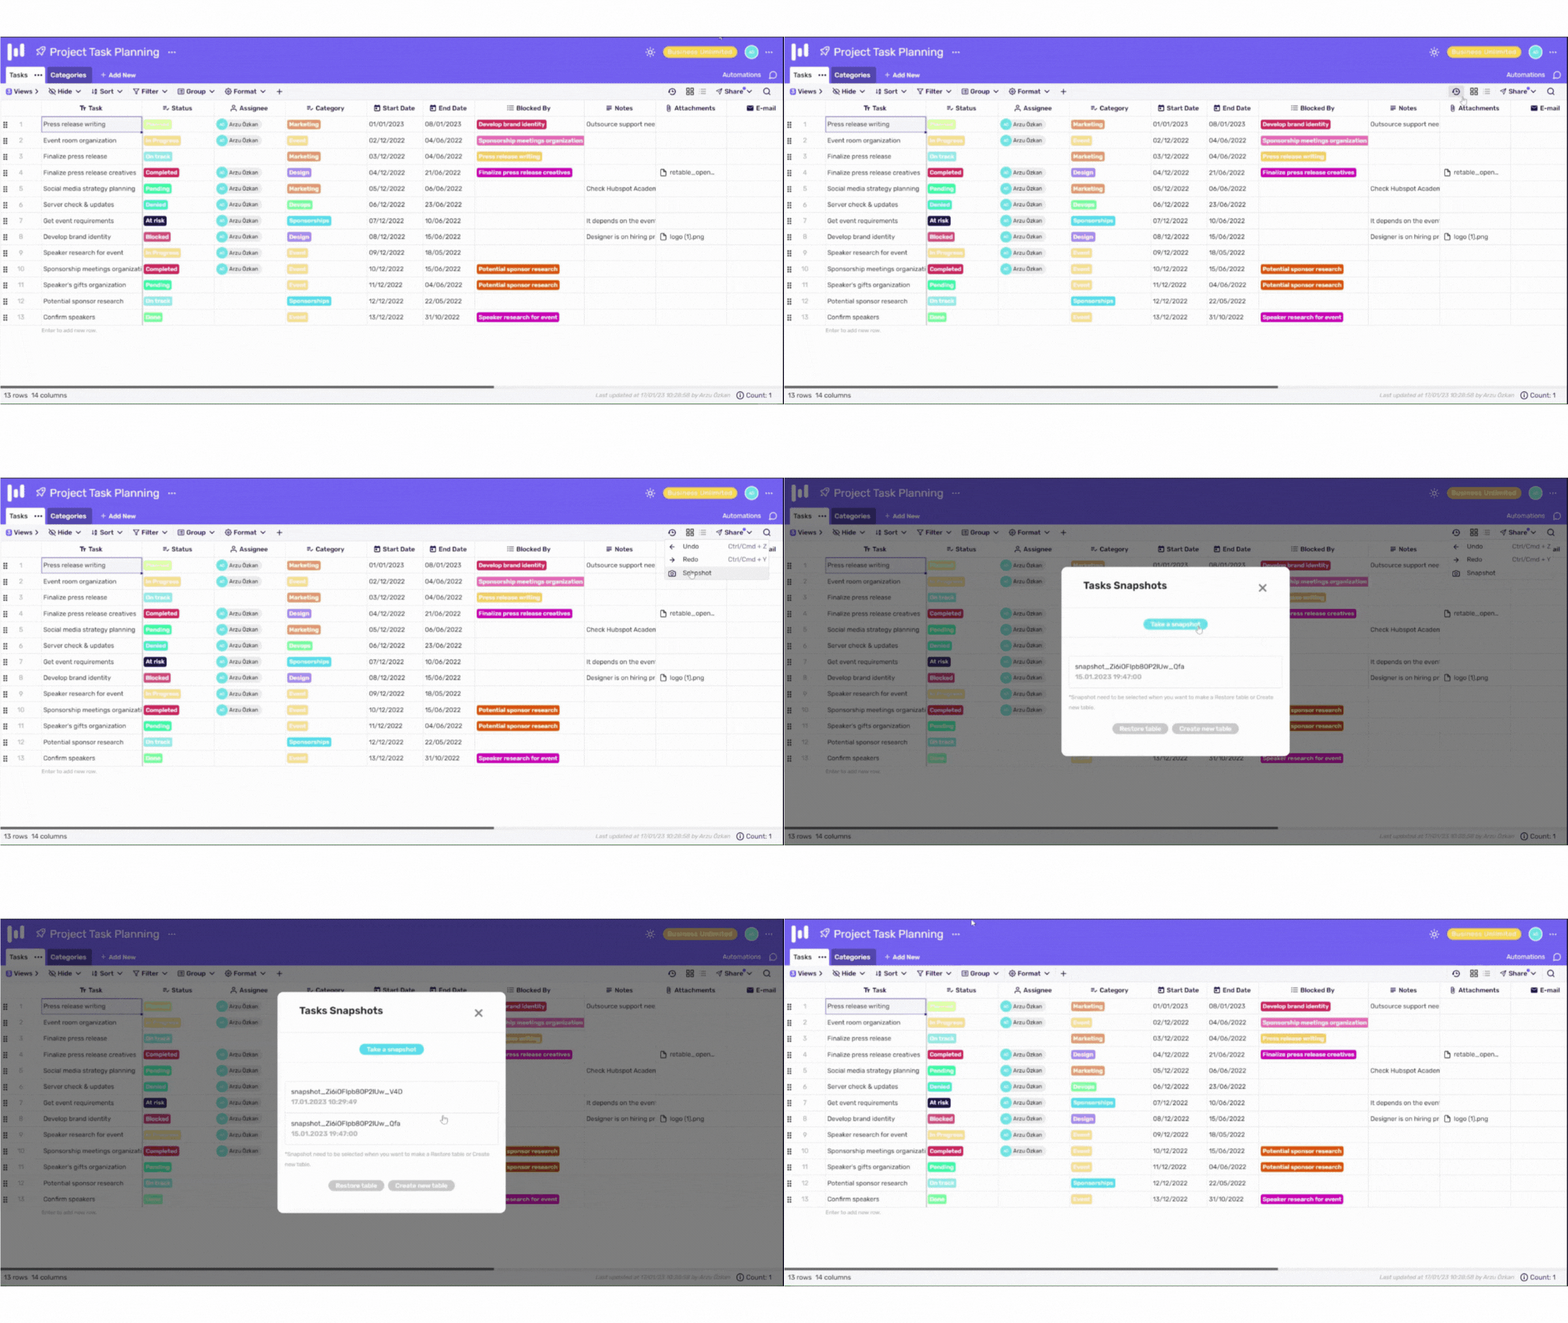
We made the table history area more visible for you. This way, you can undo or redo your tables with a single click without using keyboard shortcuts. We also added our "snapshot" feature to this field. Now if you want to take snapshots for your tables, just click the "snapshot" option from the table history area!
Let's see how it works! 👇🏻
- Click on the "Table History" icon at the top right of the table.
- Select the action you want to do between the choices (e.g. undo, redo, snapshot)
View-Specific Sharing Permissions
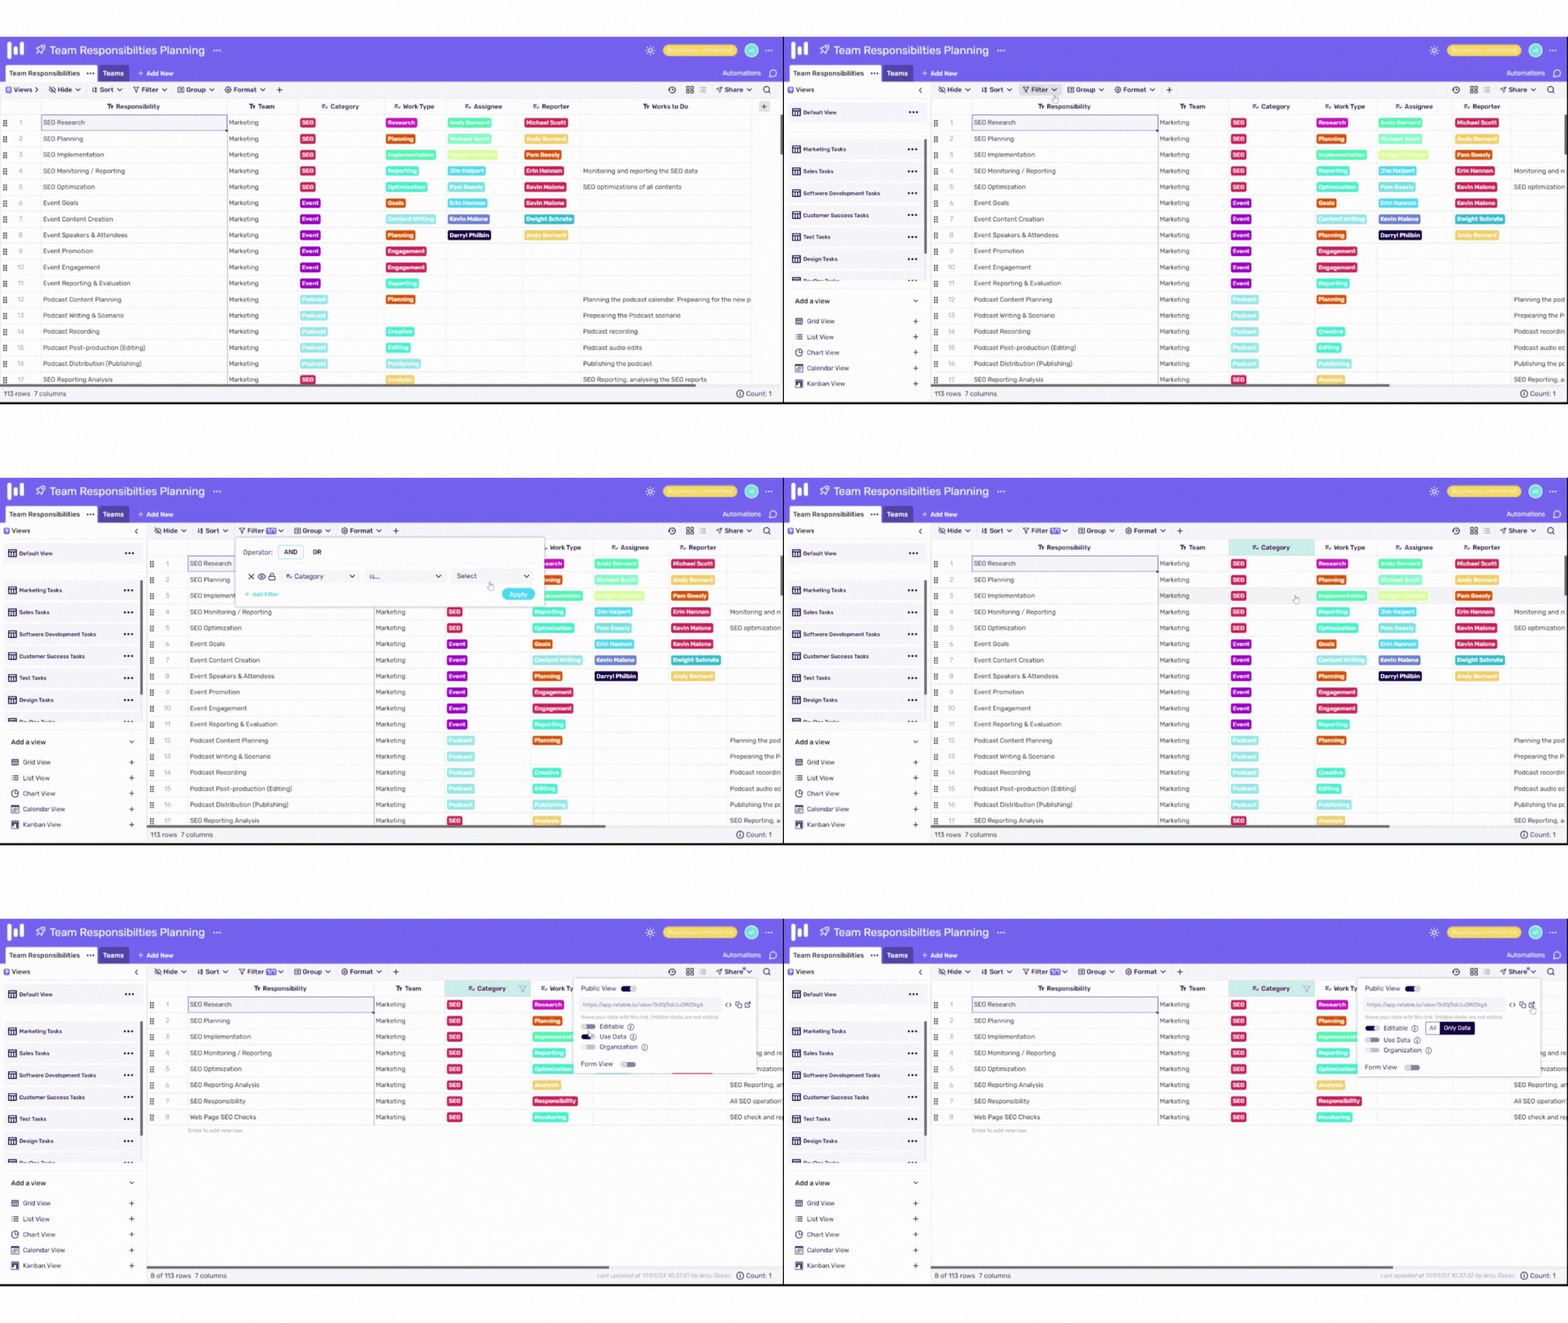
Thanks to Retable's View-Specific Sharing Permissions development, even if you share the views, you create as editable, the people you share will not change the filters you apply! Thus, by creating as many views as you want in a Retable project, you can ensure that the people you share can only edit their views and cannot access your main data.
Let's see how it works! 👇🏻
- Create a view
- Apply filters to this view as you wish
- Lock the filter by clicking the lock icon next to your filter
- Click on the "Share" menu in your view
- Activate the "Public View" toggle
- Activate the "Use Data" toggle and tick the "Only-Data" option. (If you check the "Only Data" option, the people with whom you share this view can only change the data in the view. They cannot change your filter, hide or columns)
- Now you are ready to share your view!
Data Replacing Option in File Import
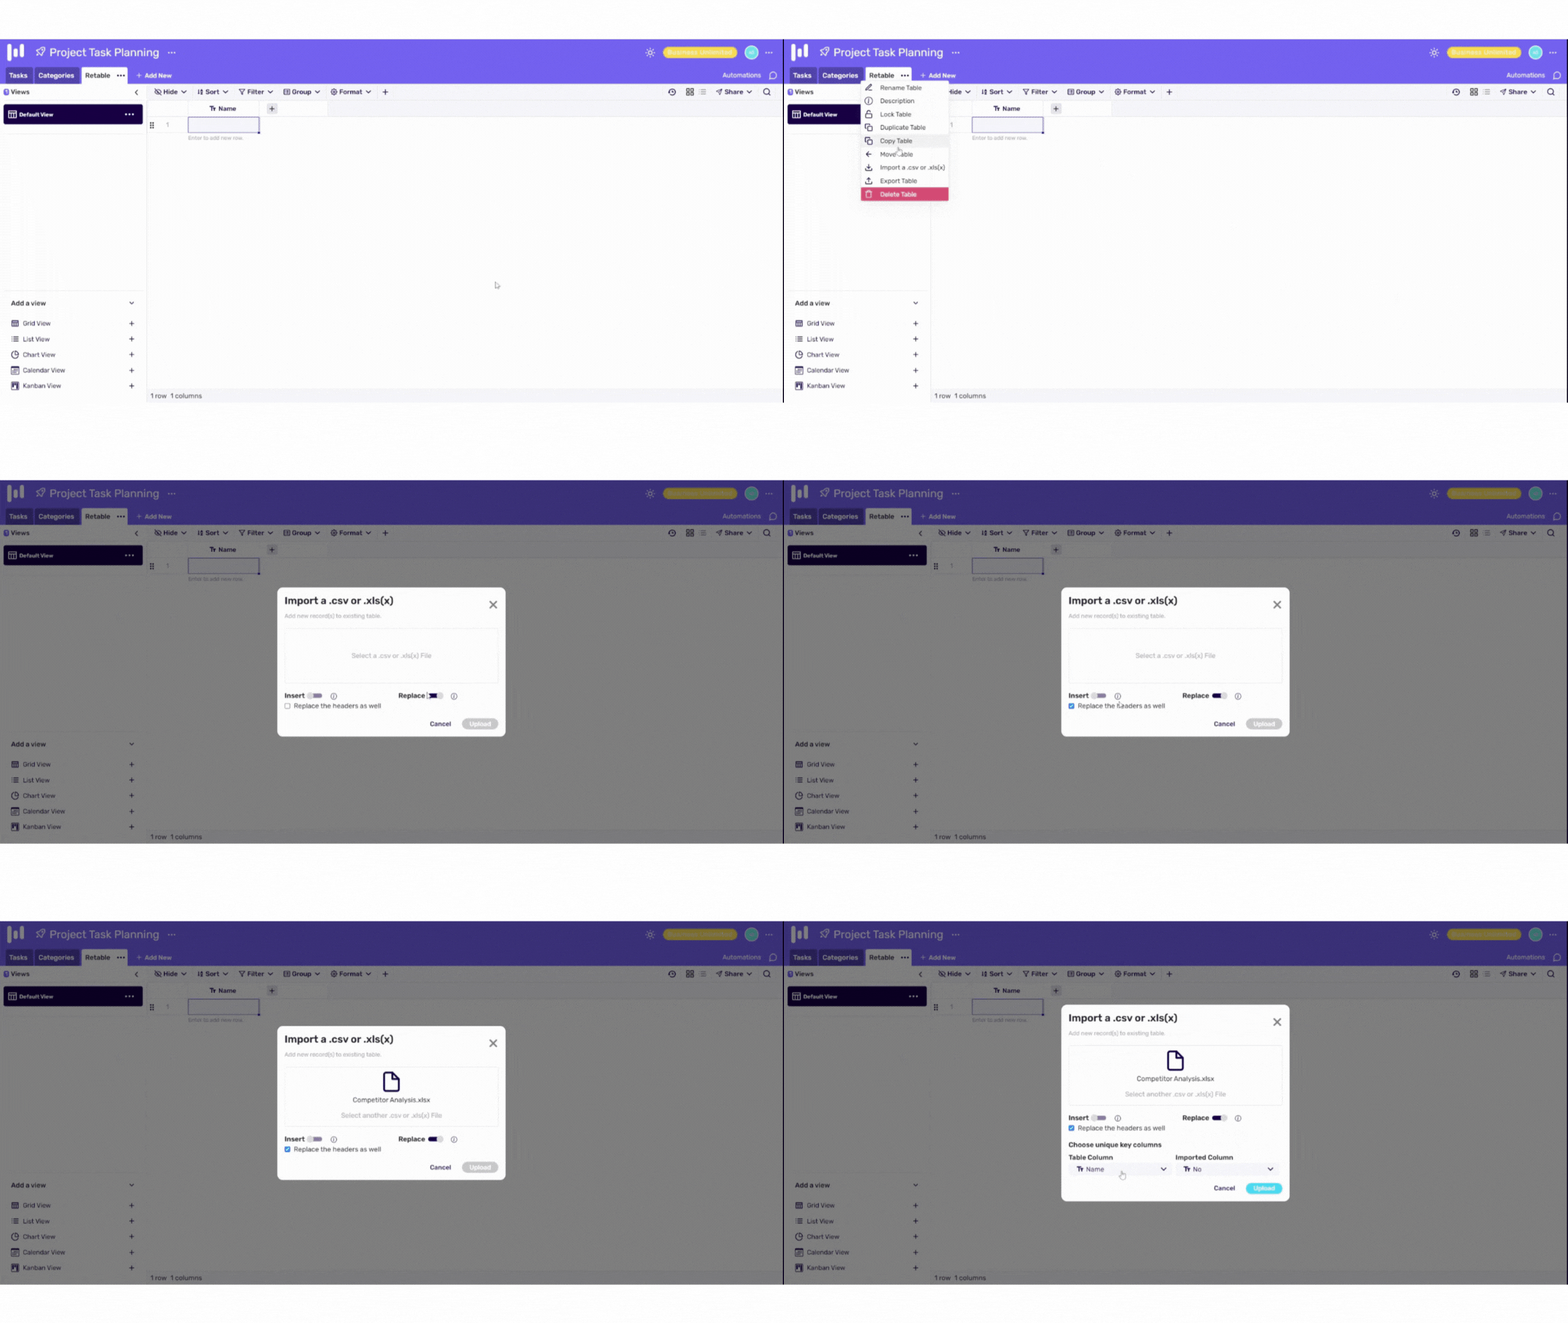
Thanks to the data replacing option, you no longer need to completely import your tables from scratch for small changes you make in the tables you import to Retable. You can only replace changes you have made to your data.
So, all your data in the table is replaced with the data you imported.
Let's see how it works! 👇🏻
- Click the 3 dots next to your table name and select import
- Select a .csv or .xls file to import
- Activate the “Replace” toggle
- Click on the "Upload" button
Changing the Email Associated with a Retable Account
You can now change the email address you have associated with your Retable user! Thus, in case you change your email, you can easily move all your Retable data.
Let's see how it works! 👇🏻
- Go to your "Account Overview"
- Click the "E-mail" area and change your email
- Type your current password and click the "Save Profile" button
If you're curious about the previous product updates check them out below! 👇🏻
more
Related Resources
Create your smart data management solution
Plan, track, and analyse with your ease. Transform your data with an all-in-one platform, collaborate with your teammates.
Try for free!
.avif)
.avif)
.png)

.avif)