.avif)
Event planning with Retable: Simplify your event organization
By using Retable’s event planning spreadsheet template, you can ease your planning procedure and keep everything in one place. Keep track of your budget, assign tasks to your team with the to-do list, and organize your speakers and attendees all in one spreadsheet.
.avif)
Are you struggling to organize your events? Our marketing team faced the same challenge until we started using the event planning template in Retable! With this template, you can streamline your event planning process with Retable's collaborative tools, and various views, ensuring no detail is overlooked.
Table of contents
- What is event planning template?
- Getting started with Retable event planning spreadsheet template
- Tables of the Retable’s event planning spreadsheet template
- Collaborating with your team
- Bonus: Setting reminders
- Conclusion
What is event planning template?
Event planning template in Retable is a comprehensive tool designed to simplify and streamline your entire event organization process. Whether you are planning a conference, workshop or any other type of event, this template will help you keep all your crucial details in one place. Event planning template includes customizable tables for tracking speakers, managing the agenda, organizing tasks, budgeting and handling attendee information. With features like real-time collaboration, automated reminders and various view options, the event planning template ensures no detail is overlooked, making event management more efficient.
Getting started with Retable event planning spreadsheet template
Retable’s event planning spreadsheet template covers all aspects of event organization, including tables for speakers, agenda, to-do list, budget, and attendees. Let’s dive into how each table can help you manage your events efficiently.
📌 To copy and customize the event planning spreadsheet template to your own Retable dashboard, click the "Copy to workspace" button in the upper right corner of the template!
Tables of the Retable’s event planning spreadsheet template
Speakers table
The speakers table is designed to keep track of all the vital information about your event speakers. Here’s how to set it up:
Columns of the speakers table
- Speaker name: By using the text column, you can write your speaker names all in one place. This ensures that everyone involved in the event knows exactly who is speaking.
- Company: The text column here specifies the organization each speaker represents, which helps in marketing the event and highlighting the credibility of the speakers.
- Title: Utilizing a single/multi-select column, you can capture the professional titles of the speakers, such as CEO or COO. This information can be used in promotional materials to enhance the speaker’s profile.
- Speaker bio: The rich text column allows you to provide a brief biography of each speaker. This is useful for introducing the speaker during the event and for promotional content.
- Email: The email column ensures the accurate capture of email addresses. By restricting entries to valid email formats, this column type is beneficial for storing and managing contact information and communication records. Clicking on the email address within this column opens your email provider app directly, allowing you to send mail immediately.
- Phone number: The phone number column records the speaker’s phone number, providing an alternative contact method for urgent communications. This feature includes the ability to initiate a call directly by clicking on a valid phone number within the column.
- Topic/presentation title: This text column details the title of the speaker’s presentation, which can be used in the event schedule and promotional materials.
- LinkedIn URL: The URL column includes a link to the speaker’s LinkedIn profile. This enhances data with clickable links, providing direct access to external web pages or resources.
- Website/blog: Another URL column provides a link to the speaker’s personal or professional website or blog, allowing attendees to learn more about the speaker’s work.
- Address: The geolocation column automatically displays location information, including street, neighborhood, city, state, and country, all within a single cell. This provides a dynamic and interactive mapping experience.
- Gift send?: The checkbox column offers a straightforward binary option, allowing you to mark whether a gift has been sent to the speaker.
- Photo: In the image column, users can enrich their data by incorporating visual elements. This column enables users to upload and view images directly within their spreadsheet.
Views of the speakers table
Card view
This visual representation makes it easier to browse and manage speaker information. In card view, you can customize the display to show key details like name, bio, email, phone number, topic, company, and title, helping to declutter the view and focus on the most relevant details. The interactive format allows you to drag-and-drop cards to prioritize speakers, simplifying speaker management.
Map view
Map view is particularly useful for visualizing the geographic locations of all your speakers. It displays all the addresses from the geolocation column on a single map, providing a comprehensive overview of where each speaker is based. You can interact with the map to zoom in on specific areas, click on the pins to see detailed address information, and navigate around to explore the geographic distribution of your speakers. This view is invaluable for logistical planning, such as arranging transportation or understanding the regional representation of your event’s speakers.
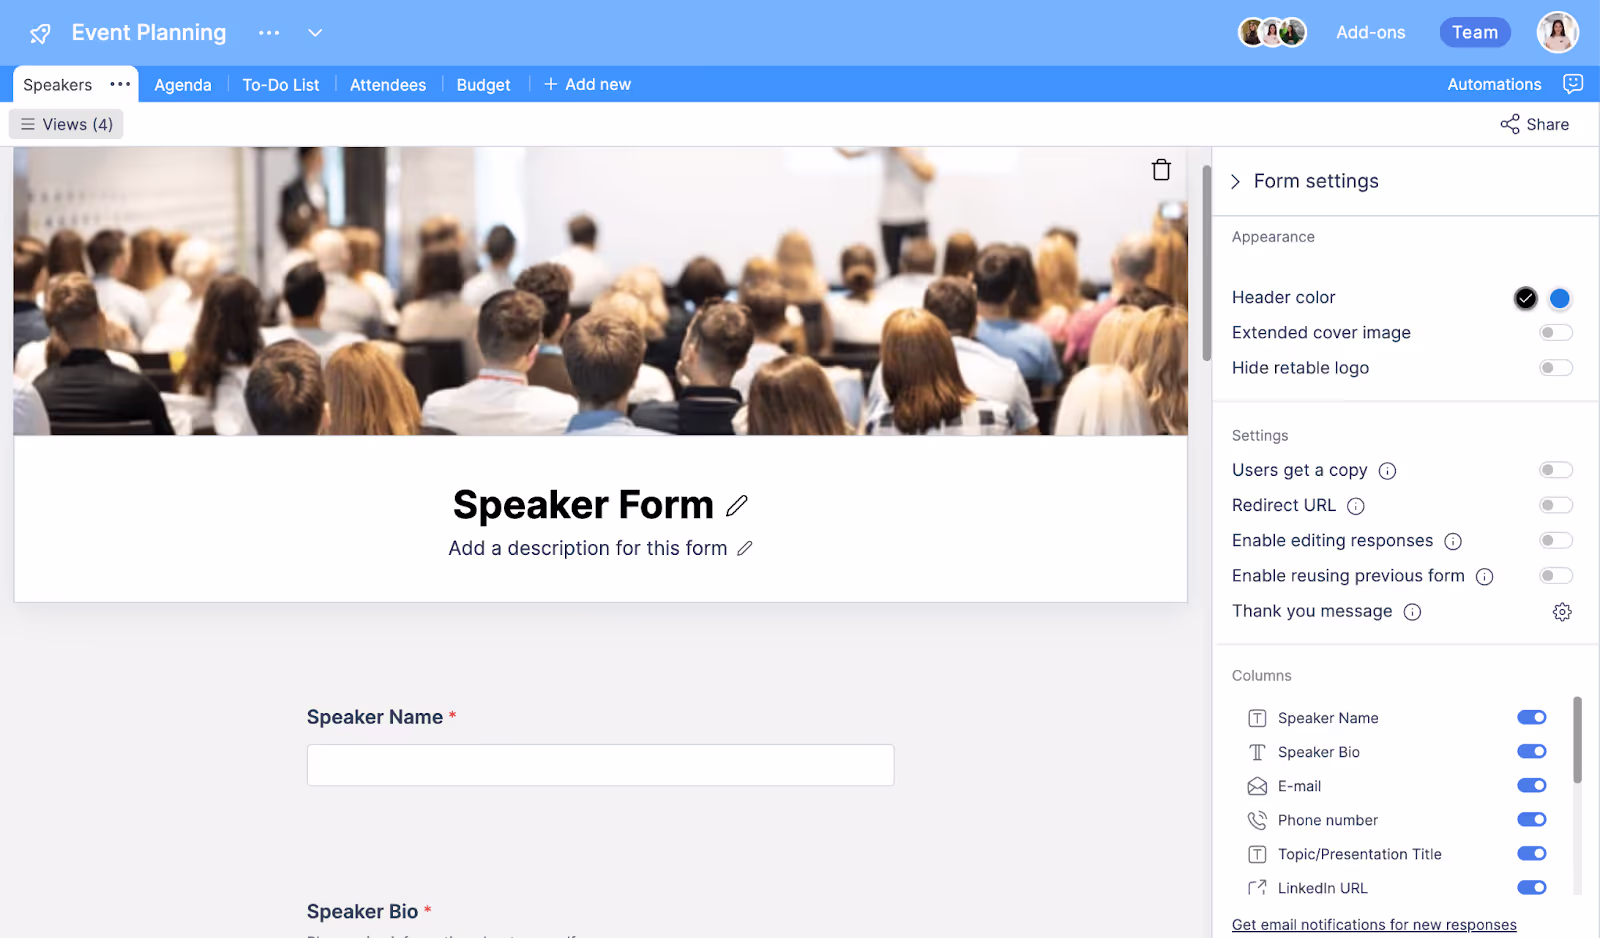
Form view
The form view allows you to create a customized form that can be sent to the speakers. When speakers fill out this form, their information is automatically transferred to the speakers table in Retable. This automation eliminates the need for manual data entry, reducing errors and saving time. You can include fields for all the necessary information, make them required, and add explanatory notes for each field. The form can be easily shared via a link, and once submitted, the data is instantly populated into the respective columns of the speakers table. This streamlined process ensures that all speaker information is collected consistently and accurately, facilitating smooth event planning and coordination
Agenda table
The agenda table helps you manage the event’s program efficiently. Here’s how to set it up:
Columns of the agenda table
- Session title: By using the text column, you can record the title of each session, ensuring that attendees have a clear idea of what each session will cover.
- Start date and time: The calendar column allows you to input specific dates and times using an interactive calendar, providing a structured approach to temporal data. This column specifies when each session starts, helping to maintain an accurate schedule.
- End date and time: Similar to the start date and time column, this column ensures that the end time for each session is clearly recorded. This helps in avoiding scheduling conflicts and ensuring that sessions do not overlap.
- Speaker: The text column here indicates the speaker presenting the session, which helps attendees decide which sessions they want to attend and facilitates smooth coordination with the speakers.
- Session description: The rich text column accommodates formatted text with various styling options, providing a comprehensive overview of what each session will cover. This helps attendees understand the content and decide if it aligns with their interests.
- Location: The single/multi-select column provides a structured approach to categorical data, allowing you to specify where each session will take place, such as Main Hall, Conference Room 1, or Lobby.
- Streaming link: The URL column includes the link for online streaming of the session, making it easy for attendees to join virtually.
Views of the agenda table
Calendar view
The calendar view provides a visual representation of the entire event agenda in a calendar format. This view allows you to see all your sessions laid out by their start and end times, giving you a clear overview of the event's timeline. You can spot gaps or overlaps and adjust timings easily. Switch between day, week, or month views, and reschedule sessions by dragging and dropping them, with changes reflected automatically. This view is especially useful for attendees who want to plan their day and know exactly when and where each session is taking place. It also helps organizers keep track of the event in real-time, ensuring that everything runs according to plan.
To-do list table
The to-do list table helps you manage all the tasks necessary for the event. Here’s how to set it up:
Columns of the to-do list table
- Task description: The text column provides a detailed description of each task, helping you keep track of what needs to be done.
- Assigned to: The collaborator column is a powerful feature that allows you to assign specific tasks to team members. By enabling the “Add multiple collaborators” option, you can select multiple users for a single task, facilitating teamwork and shared responsibilities. This column indicates the team member responsible for the task, ensuring accountability and clarity in task delegation.
- Due date: The calendar column specifies the deadline for each task, helping keep the project on schedule and ensuring timely completion of tasks.
- Priority: The single/multi-select column allows you to categorize tasks based on their urgency, such as low, medium, and high. This helps prioritize your team’s workload effectively.
- Status: Another single/multi-select column tracks the current status of each task, providing a quick overview of progress and helping identify any tasks that are falling behind.
- Notes/comments: The text column allows for additional information or instructions related to the task, providing context and clarifying any special requirements.
Views of the to-do list table
Kanban view
The Kanban view organizes tasks into columns based on their status, providing a clear and intuitive way to track progress. In this view, tasks are stacked by the “Status” column, allowing you to see at a glance which tasks are pending, which are being worked on, and which are finished. You can easily move tasks between columns by dragging and dropping them. This visual representation is particularly useful for managing workflows and ensuring that tasks are completed on time.
Budget table
The budget table helps you track and manage the financial aspects of your event, ensuring that you stay within budget and all expenses are accounted for. Here’s how to set it up:
Columns of the budget table
- Expense description: By using the text column, you can provide detailed descriptions of each expense. This helps in understanding what each cost is for and aids in budget analysis.
- Estimated cost: The currency column allows you to record the projected cost of each expense. This helps in planning the budget and ensuring that all costs are accounted for in advance.
- Actual cost: Another currency column captures the actual cost incurred for each expense. Comparing this with the estimated cost helps in budget management and identifying any discrepancies.
- Payment status: The single/multi-select column tracks the payment status of each expense, such as paid, pending, and not paid. This helps manage cash flow and ensures that all payments are made on time.
Views of the budget table
Kanban view
The Kanban view organizes payment status into columns based on their status, providing a clear and intuitive way to track payments. In this view, payments are stacked by the “Status” column, allowing you to see at a glance which payments are pending, which are paid, and which are not paid. You can easily move payments between columns by dragging and dropping them. This visual representation is particularly useful for managing workflows and ensuring that tasks are completed on time.
Attendees table
The attendees table helps you manage the registrations and information of your event attendees. Here’s how to set it up:
Columns of the attendees table
- Name: By using the text column, you can record the full name of each attendee. This ensures that all attendees are properly registered and can be identified easily.
- Email: The email column captures the contact email of each attendee. This is essential for sending out event updates, reminders, and follow-up communications.
- Company: The text column specifies the organization the attendee represents, which helps in networking and understanding the attendee’s background and professional context.
- Title: By using the text column, you can record the professional title of each attendee. This information can be used to tailor communications and understand the attendee's role and interests within their organization.
- Pass card QR: The QR code column allows you to generate custom QR codes for attendee access passes. This provides a quick and convenient way to share information such as access passes.
Views of the attendees table
Form view
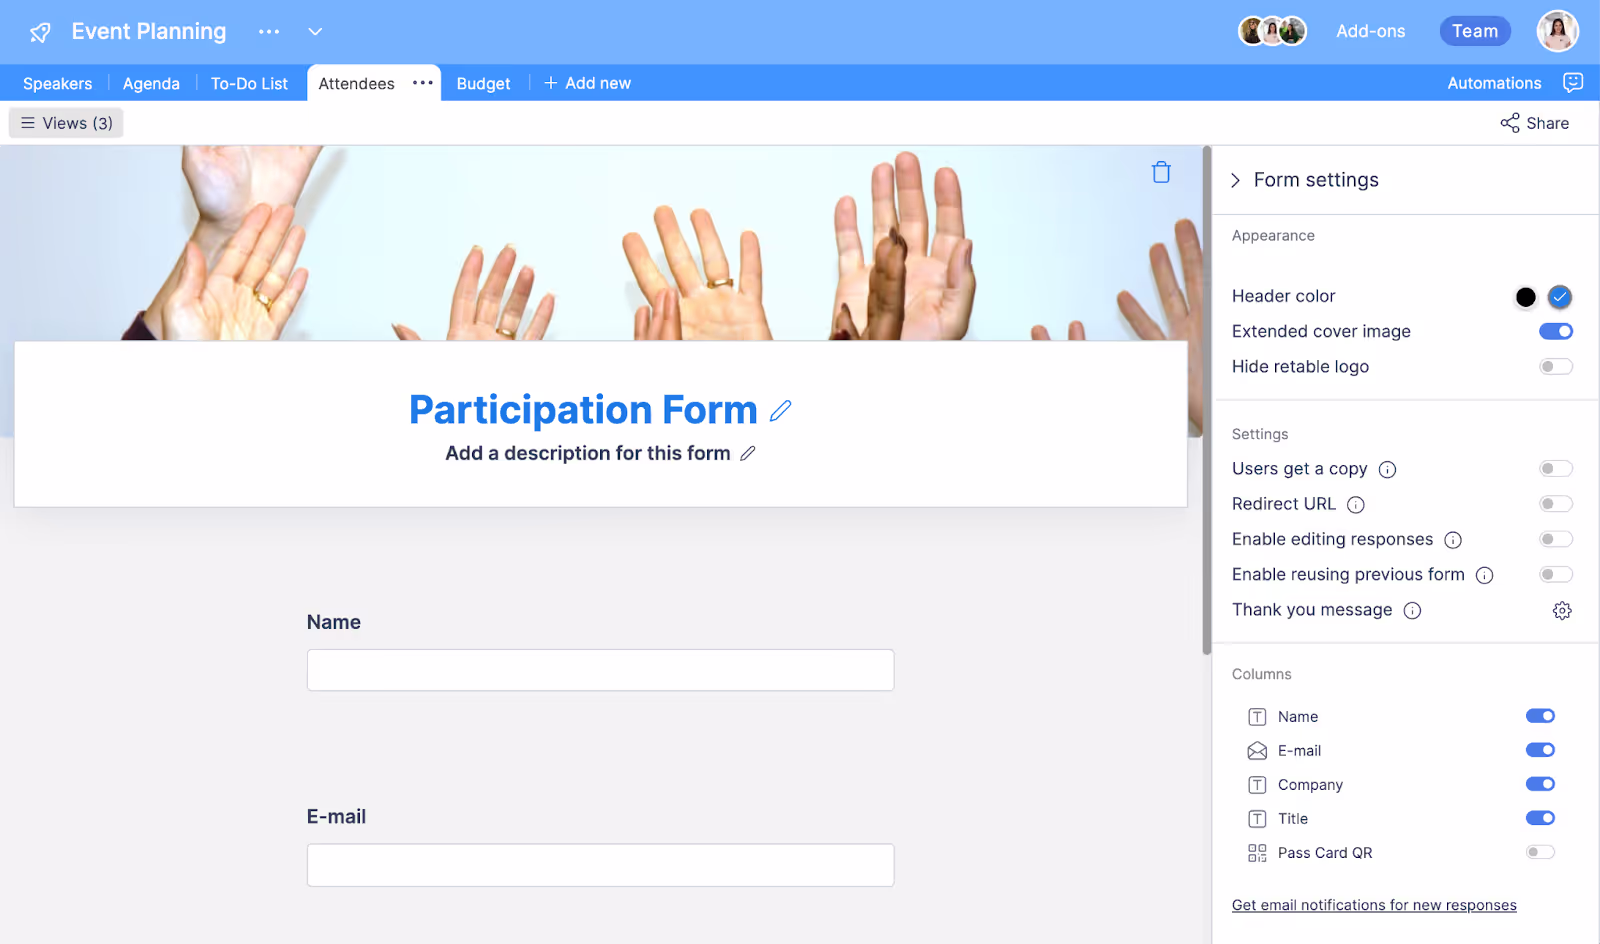
Create a customized form for attendee registration. When attendees fill out the form and submit their information, it is automatically transferred to the attendees table in Retable. This automation eliminates the need for manual data entry, reducing errors and saving time. The form can include fields for all necessary information and can be easily shared via a link or embedded on your event’s website. This ensures that all attendee information is collected consistently and accurately, facilitating smooth event planning and coordination.
Card view
The Card view for the attendees table provides a visually organized way to manage attendee information. Stacked by the Pass card QR column, which allows you to print attendee badges for the organization, allows you to easily see and access each attendee’s detail in a card format. Each card includes essential information such as attendee’s names, emails, companies, titles and their unique QR code for quick check-in at the event. This interactive format enhances data management, making the event registration entry process fast and without any error.
Collaborating with your team
Retable makes it easy to collaborate with your team. You can share your project by clicking the three dots next to the project name, selecting the sharing settings, and inviting users via email. Assign roles like owner, viewer, or editor, and enable notifications to keep everyone informed about updates and changes in real-time.
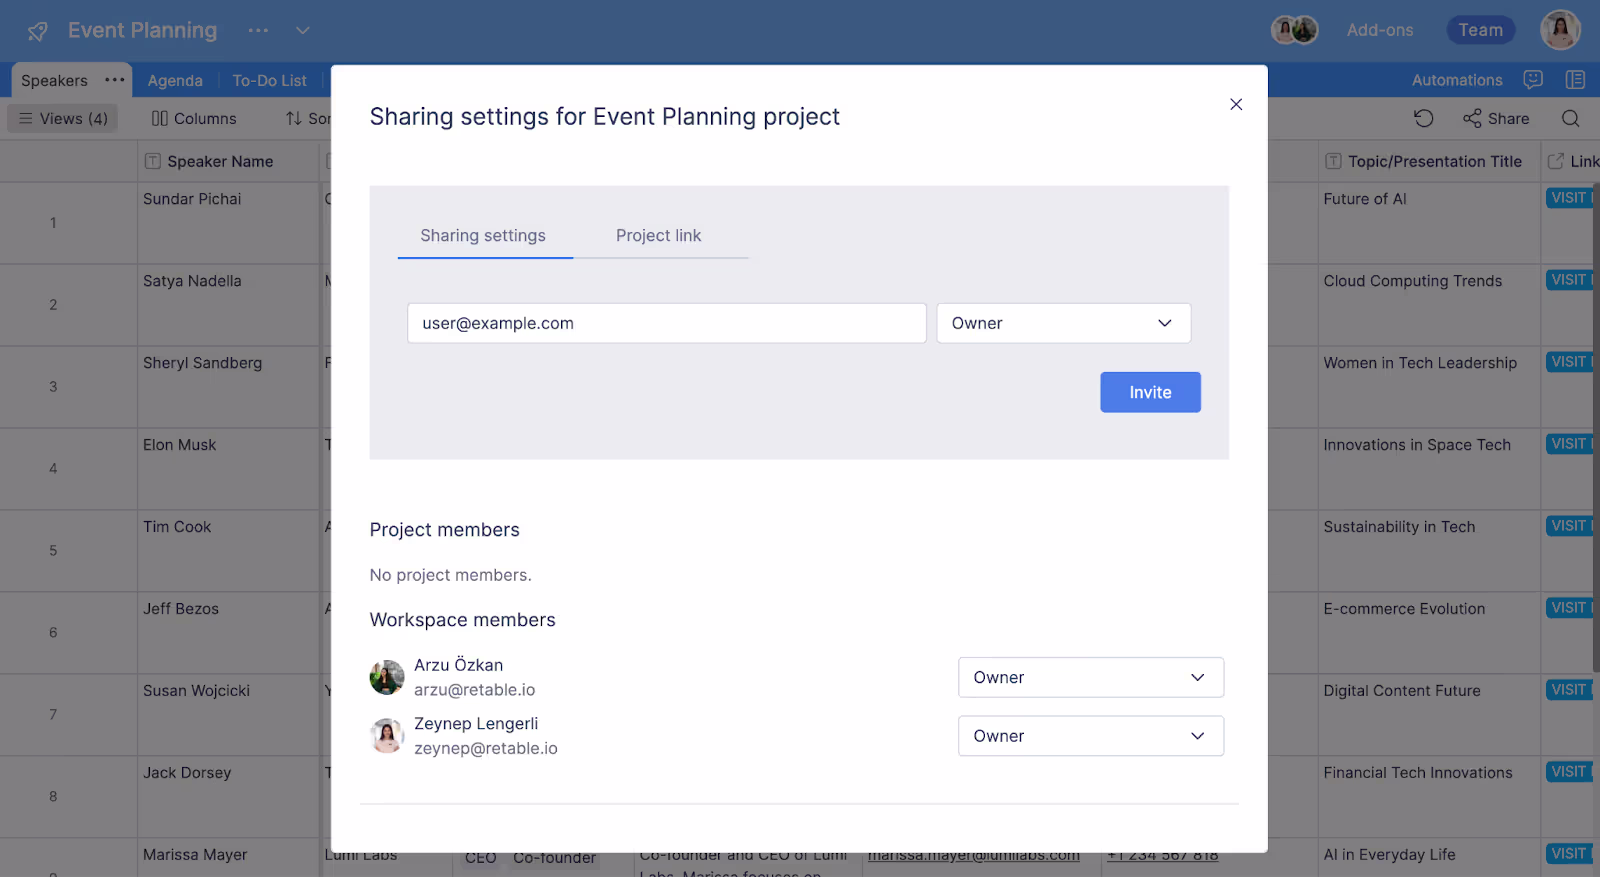
- Sharing Settings: By adjusting the sharing settings, you can control who has access to your project and what level of access they have. You can invite users by simply typing their email addresses and selecting their roles.
- Real-Time Collaboration: Once users accept the invite, they can access the project and collaborate in real-time. Any changes made are instantly visible to all collaborators, ensuring everyone stays on the same page.
- Notifications: Enable notifications for collaborators to ensure they are informed about updates and changes. Notifications can be set up to alert users when they are added to a task, when a task is updated, or when deadlines are approaching. This ensures that everyone is aware of their responsibilities and any changes to the plan.
Bonus: Setting reminders
Retable’s new reminder feature helps ensure tasks are completed on time and that team members are promptly informed about their responsibilities. Here’s how you can set up reminders:
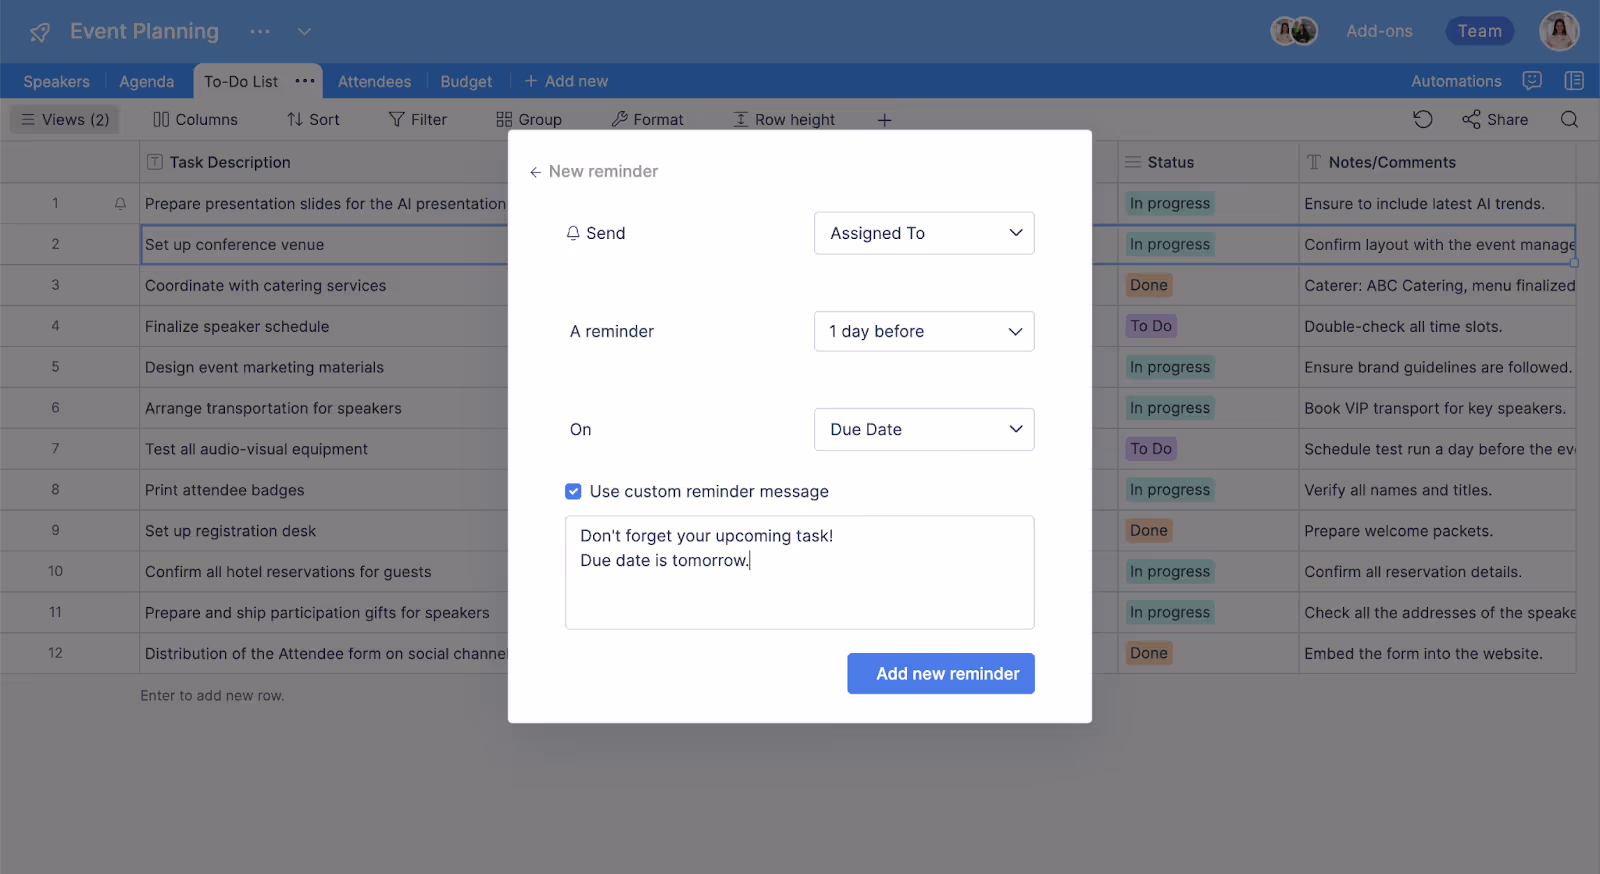
- Set up reminders: Click the bell icon at the beginning of a row to open a pop-up window where you can set up a reminder. Choose the specific user to notify, or select the “Collaborator Column” option to automatically notify all assigned collaborators whenever there’s a change made in the row.
- Timing options: Specify when the reminder should be sent, such as today, 1 day before, up to 7 days before the task is due. This flexibility ensures that reminders are sent at the most appropriate times.
- Custom message: Write a custom reminder message to be included in the notification, providing context and specific instructions related to the task. This personalized message helps ensure that team members understand their responsibilities and deadlines clearly.
Conclusion
Retable is a powerful tool that can transform your event planning process. By using its customizable templates, collaborative features, and various views, you can manage every detail of your event efficiently. From tracking speaker information and managing the event agenda to organizing tasks, monitoring the budget, and handling attendee registrations, Retable provides all the tools you need for successful event planning.
Collaborating with your team is seamless with Retable’s real-time updates and notification features. Setting reminders ensures that tasks are completed on time, and the various views available for each table help visualize and manage your data effectively.
Don’t forget that you can either create your own tables or take advantage of the ready-made templates Retable offers by visiting our template archive. For even more options and inspiration, check out our comprehensive template gallery and find the perfect fit for your event planning needs! Happy event planning with Retable!
more
Related Resources


Create your smart data management solution
Plan, track, and analyse with your ease. Transform your data with an all-in-one platform, collaborate with your teammates.
Try for free!