Dive into the world of Retable’s public sharing settings, where you can transform how you share your views and forms with the world. This feature is perfect for extending your workspace's reach, allowing anyone with the link to view or interact with your data. Whether you’re sharing a table view with customized filters or creating a public form for wide-scale data collection, Retable empowers you with the flexibility to control what you share and how others can interact with it. 🌟
Table of contents
- Sharing projects publicly
- Using the ask to update feature
- Setting public view visibility
- Customizing public forms
Sharing projects publicly
Sharing projects publicly in Retable transforms the way you collaborate and disseminate information. By leveraging public sharing settings, you can effortlessly share your projects with a wider audience through unique links. This feature enables anyone with the link to view or interact with your data, whether it’s a table view or a public form for data collection. Retable’s flexible sharing options allow you to control what you share and how others can interact with it, ensuring your data remains accessible yet secure.

- Access sharing settings
- Click on the three dots next to the project name to open the menu.
- Select "Sharing Settings" from the menu.
- Enable public sharing
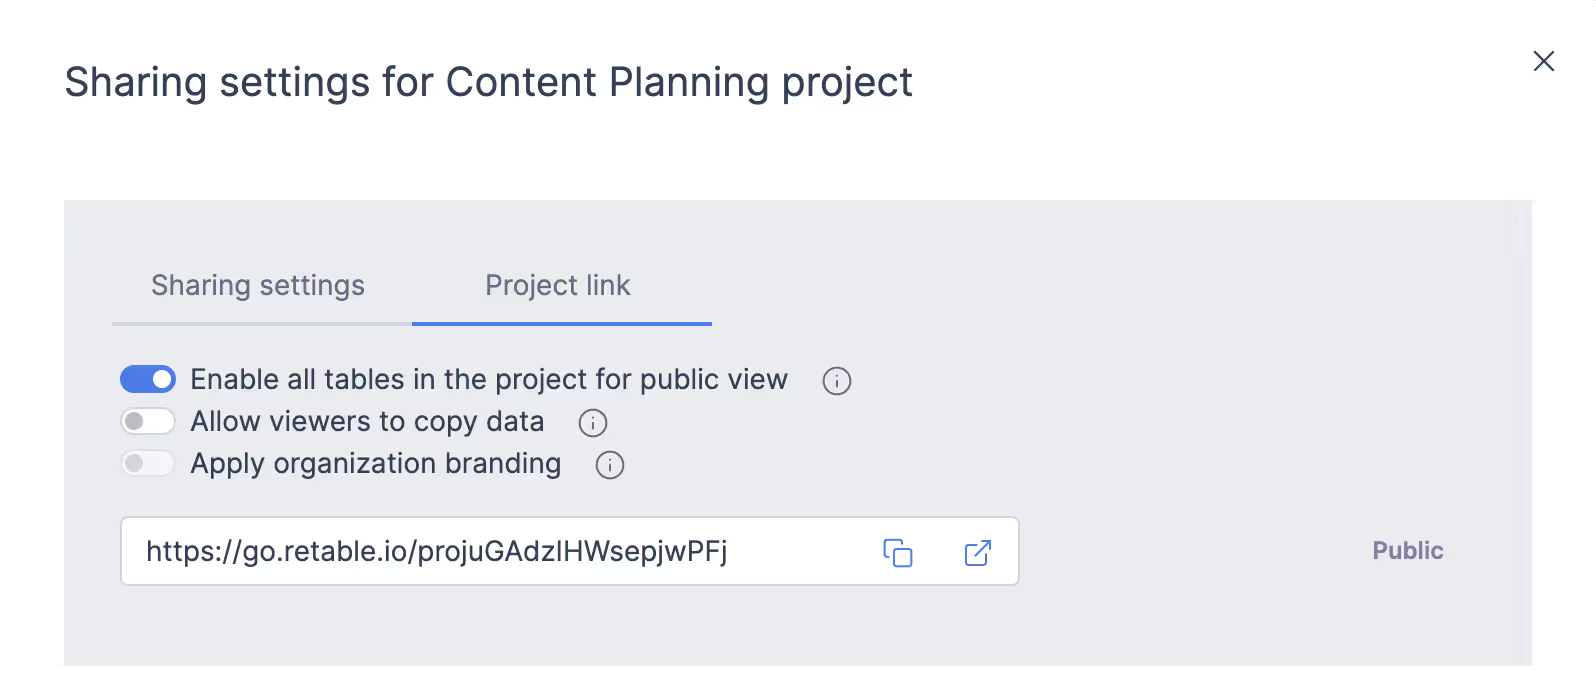
- Go to the "Project link" tab.
- Activate the "Enable all tables in the project for public view" toggle. This will make the entire project viewable to the public.
- Copy the public link:
- At the bottom of the window, copy the link. This link allows people to view the project but not make any edits.
- The public link grants access to all tables and views within the project.
- Hide specific views (optional):
- If there are specific views you want to hide, navigate to that view.
- Turn off the public sharing toggle for that view to prevent it from being visible. To do this, you can click on the 'Share' button located in the right corner of the view.
- Allow viewers to copy data (optional):
- In the "Project Link" tab, activate the "Allow viewers to copy data" toggle if you want viewers to be able to copy the project.
- This allows anyone with the link to copy the project to their own Retable account and customize it, while the main project remains unchanged.
Using the ask to update feature
Retable's "ask to update" feature enables you to share edit links for specific rows, automatically converting these rows into a quick form. When you send an ask to update link to someone, they can only edit the designated row and cannot access your other data, ensuring focused and secure updates.
How to use "Ask to update"

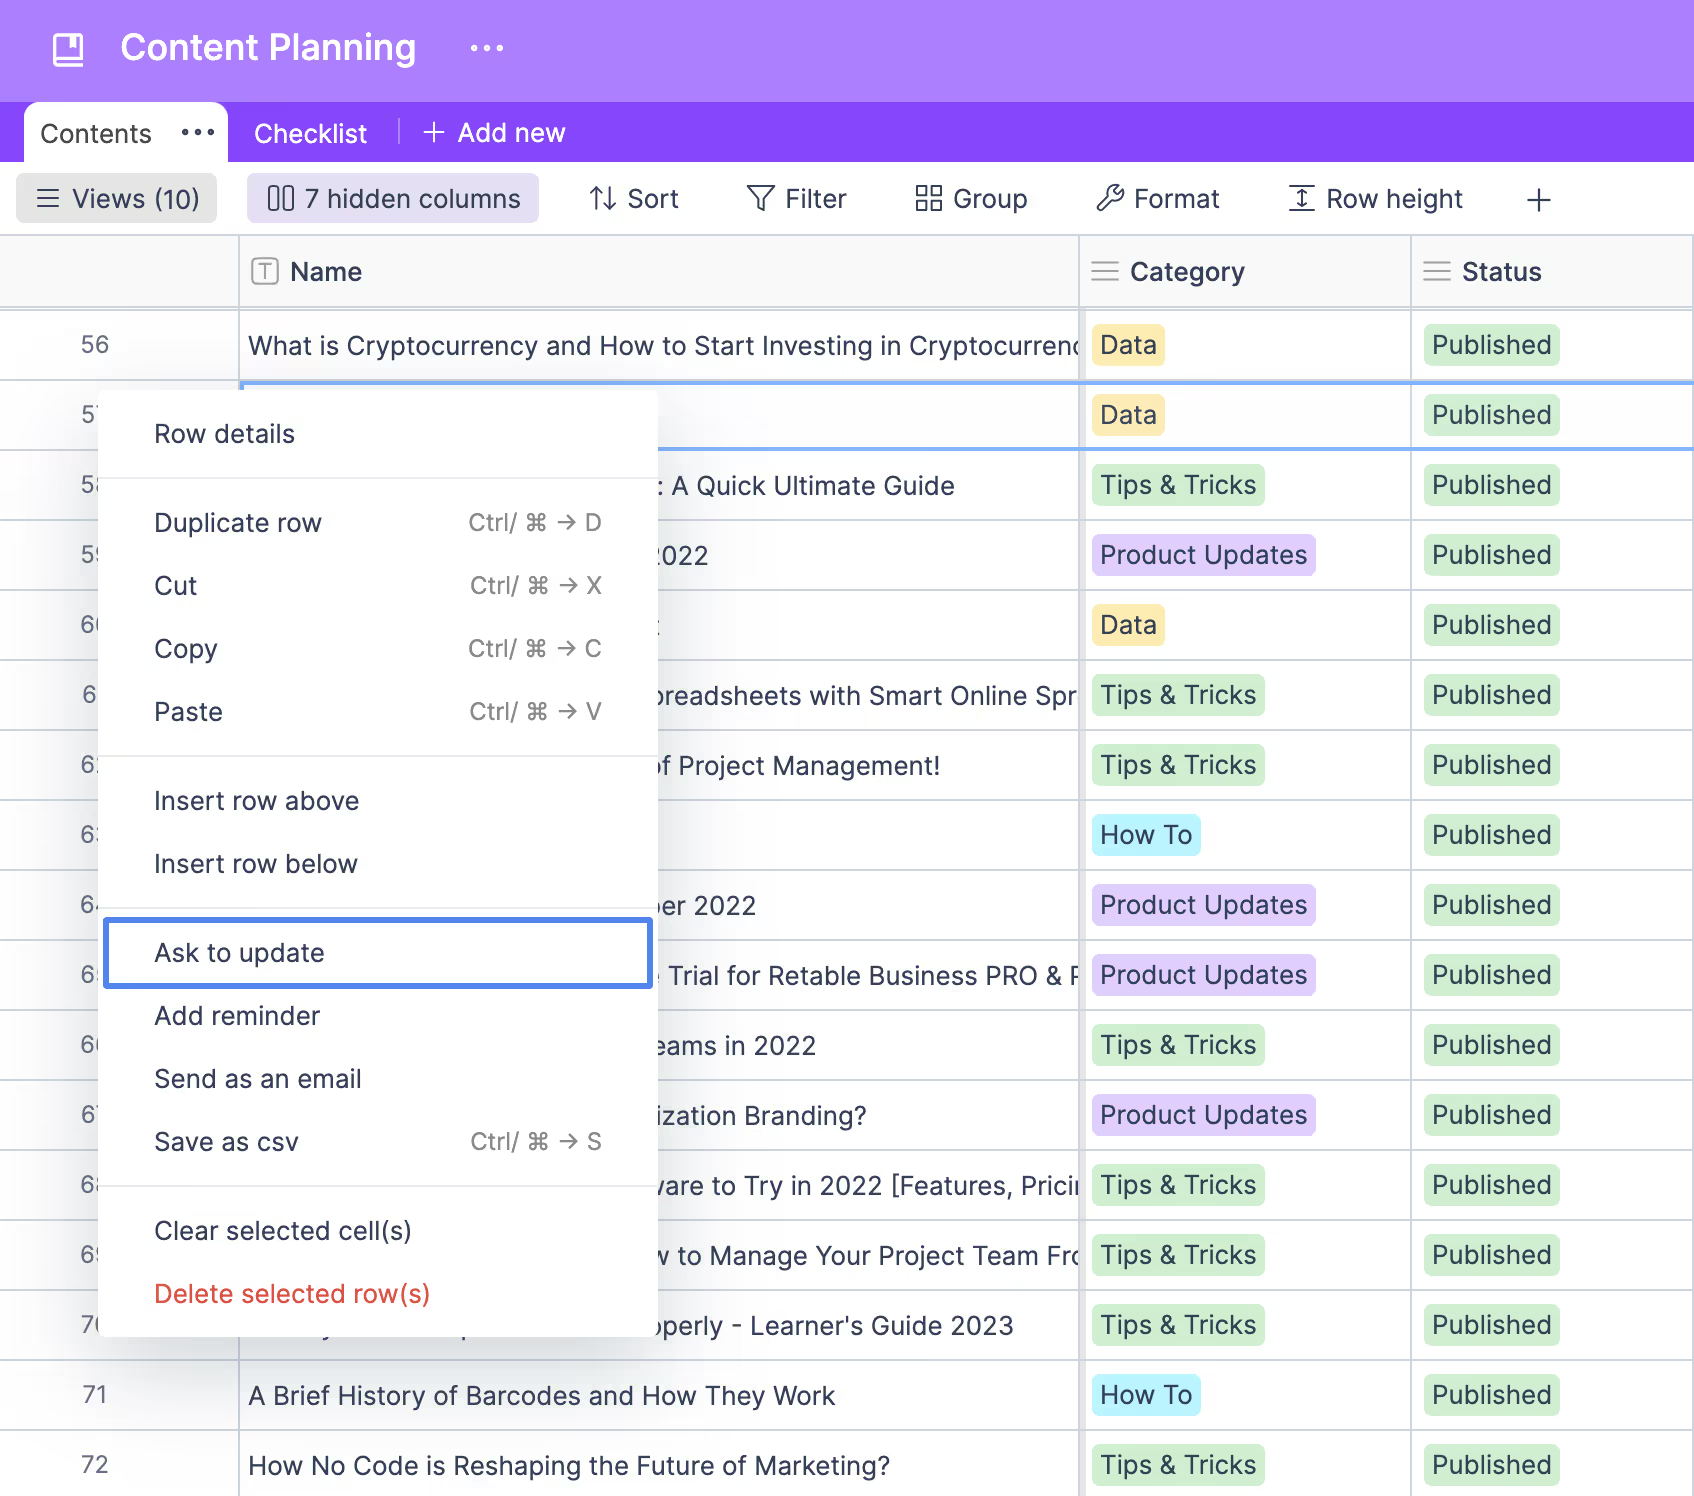
- When you right-click on any cell in your Retable table, you will see the "Ask to update" option.
- The "Ask to update" feature in Retable consists of two options:
- 1. This row: Creates an ask to update link for the specific row you right-clicked. Recipients of this link can only update the data in that particular row.
- 2. All rows: Requires your table to include a collaborator or email column. You can select the columns to be updated from the "All rows" screen, and these columns are sent to users whose email addresses are in the table or to the assigned persons. This is ideal for assigning rows to teammates for updates. When your teammates receive the email and click the link, they will see a form where they can only edit the rows assigned to them.
PS: To use the "Ask to update" feature, you must enable the form view of your table.
How collaborators use it
- A form link via email will be sent to the collaborators asking them to edit the columns you have allowed in the relevant line.
- When they click on the link in the email sent, they can make changes to the row via the form.
Setting public view visibility
Setting public view visibility enables you to generate shareable links for your specific views, decide on editing permissions, and ensure that only the intended data is visible to the public. By tailoring public view settings, you can mask sensitive information, manage who can copy or export your data, and apply your organization's branding for a professional appearance.
- Click the "Share" button in the right corner of the view to open sharing options.
- Toggle on the "Create link to view" to generate a shareable link for the specific view.
- Activate the "Editable" switch if you want others to edit the view. Decide between "All" and "Only Data" to set the editing limitations.
- Enable the "Use Data" switch to allow logged-in users to add your view to their own tables by using it as a template.
- To mask sensitive data in your public views, go to “Customize Column,” activate the “Mask Data” option, and save.
- If you activate the hide toolbar, the Retable toolbar will be hidden in public views.
- If you activate disabled export, no one can export the views they share publicly.
- If you activate apply organization branding, you can apply your own special organization branding to the public views if the project was created in an organization workspace.
Customizing public forms
Customizing public forms in Retable provides you with the flexibility to design and share forms that meet your specific data collection needs. This feature allows you to personalize the appearance and functionality of your forms, including adding cover images and formatting form descriptions with the markdown editor. You can make fields required, rename columns, and add detailed instructions to ensure accurate data input. Additionally, you can enhance security by restricting access to logged-in users and setting up automated email responses or redirect URLs for a seamless user experience.
How to customize public forms
- From the right corner of the form view, click the "Share" button and then activate the "Enable public form" switch
- You can share the link to get submissions from anyone
- You can easily add a cover image and fill in the form name and description.
- Customize the description using the markdown editor for formatting, links, or texts.
- Make fields required, change column names, or add descriptions to ensure the form collects data precisely as needed.
- Adjust the form’s appearance with headline color options, extend the cover image, and decide whether to show or hide the Retable logo.
- Enable "Send mail" for respondents to receive a copy of their responses.
- Set a "Redirect URL" to guide users to a specified webpage after submission.
- Restrict access to only logged-in users if needed, enhancing security and ensuring only authorized users can interact with your form.
Restricting form access to logged-in users:
- In the sharing settings, activate the "Only logged in users can view and submit" option.
- This prevents anonymous submissions and ensures that all responses come from verified Retable users.
In Retable, sharing is designed with specificity—sharing a project does not reveal your entire workspace but rather focuses on the individual project. You can choose direct team sharing, which synchronizes instantly with your team members, or use a shareable link that allows access without requiring a Retable account. This approach distinctly separates sharing workspaces, projects, and links, enabling precise control over access and enhancing collaborative efficiency.
Unlock a new level of collaborative efficiency with Retable by signing up for free today and delving into the Retable Academy! Access a plethora of resources, including tutorials, guides, and tips, all designed to help you master Retable's powerful features and elevate your data management capabilities. 🚀
more
Related Resources
Create your smart data management solution
Plan, track, and analyse with your ease. Transform your data with an all-in-one platform, collaborate with your teammates.
Try for free!
.avif)

.avif)
.avif)
.avif)