.avif)
.avif)
Navigate the organization members, teams, and roles within Retable with ease. This guide is designed to help you effectively manage your organizational structure, ensuring each member and team is aligned with their respective roles and responsibilities. Let’s dive in to understand how you can optimize collaboration and efficiency within your Retable organization. 🌟
Table of contents
- Understanding organizations and teams
- Creating an organization
- User roles and permissions
- Customizing your organization
- Managing members and teams
- Organization and team settings
Understanding organizations and teams
Let's dive deep into the structure and purpose of organizations and teams within Retable to streamline your collaboration.
What is an organization?
The purpose of an organization in Retable is to provide a centralized billing and management system. The paying person can add multiple users to the organization based on the number of seats purchased. For example, if you buy a team plan for 5 seats, you can invite 5 people to your organization. They can then use all the team plan features of Retable for free without making any additional payments.
Retable's organization feature is designed to enhance team management through structured and efficient planning. With this feature, you can create an organization for your company, establish multiple teams, and assign members to relevant teams, enabling team-based authorizations and a more organized approach to project and data management.
Members added to your organization will count against your seat allocation, allowing them to access all of Retable's premium features at no additional cost. However, adding a user to your organization does not automatically grant them access to all workspaces and projects. For collaboration on specific workspaces or projects, users must be individually invited to those particular areas.
What is a team?
A team in Retable is a subgroup within your organization where you can add members and manage them separately. Teams allow you to create workspaces where individual projects can be managed collectively. You can create unlimited teams, and a user can be in more than one team.
Teams are useful for organizing your workspace and sharing resources efficiently using the @teamname tag, simplifying the process when members join or leave.
Creating an organization
How to create an organization:
The first thing you need to do to benefit from Retable's organizational capabilities is to create your organization. You can quickly create your Retable organization by following a few quick steps.
- Go to your Retable dashboard and click on your proofile icon located at the top-right side.
- Click the "Organization" option from the menu.
- Enter your organization name and details.
- Now, you're all set! You can start to customize your organization.
Adding members
By following the steps below, you can invite your collaborators to your Retable organization. An invitation email will be sent by Retable to the people you invite to your organization. They can join your organization by clicking the acceptance link in this email. People you add to your organization can benefit from all Retable's premium features for free. You can invite as many users to your organization as the number of seats you have. Remember that the people you invite to your organization do not have the authority to see all your data in Retable. They can only access projects and workspaces that you allow them to access.
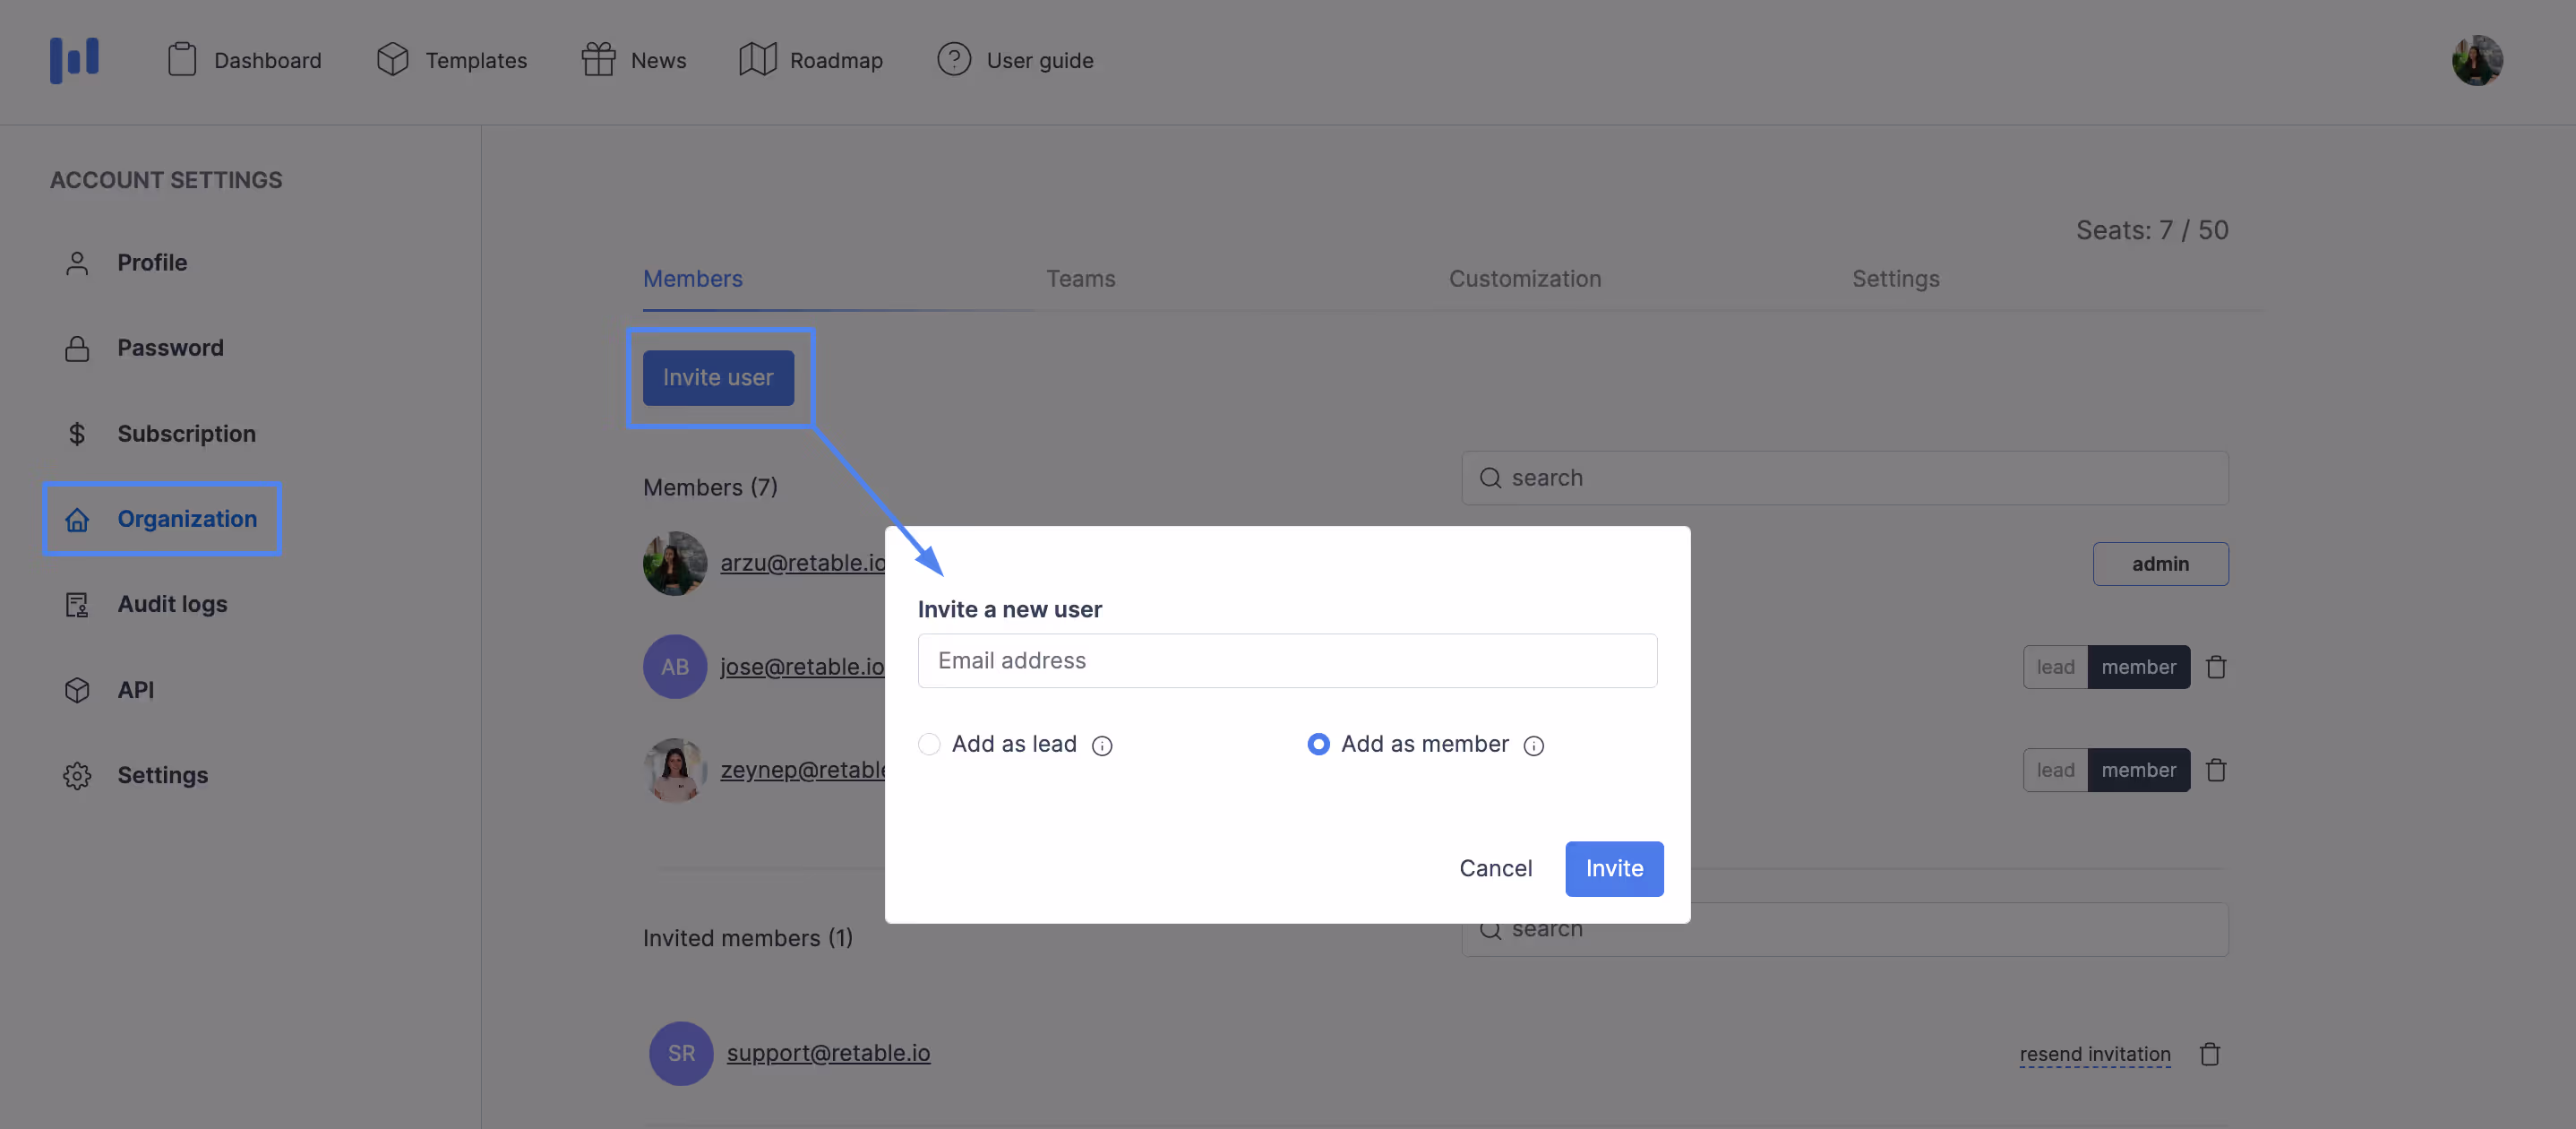
- Go to the members tab under your organization
- Click the "invite user" button
- Invite members by entering their email addresses
- Authorize as a lead or member
- Click the "invite" button
- Alternatively, generate and share an invitation link.
User roles and permissions
There are basically three types of roles in the Retable's organizational structure.
- Admin: Comprehensive control over the organization, managing all aspects and settings. The person who pays for the organization is automatically grantedd as the admin and the admin of an organization cannot be changed. An organization can only have one admin.
- Leads: Can add and remove members but are limited to the teams they oversee.
- Members: No administrative privileges on the organization. They can only work in the workspace and projects you authorize them in accordance with the roles granted to them.
Customizing your organization
Retable offers a variety of options to customize your organization. By taking advantage of these features, you can apply your own corporate branding to your Retable organization and have a custom platform.
How to customize your organization:
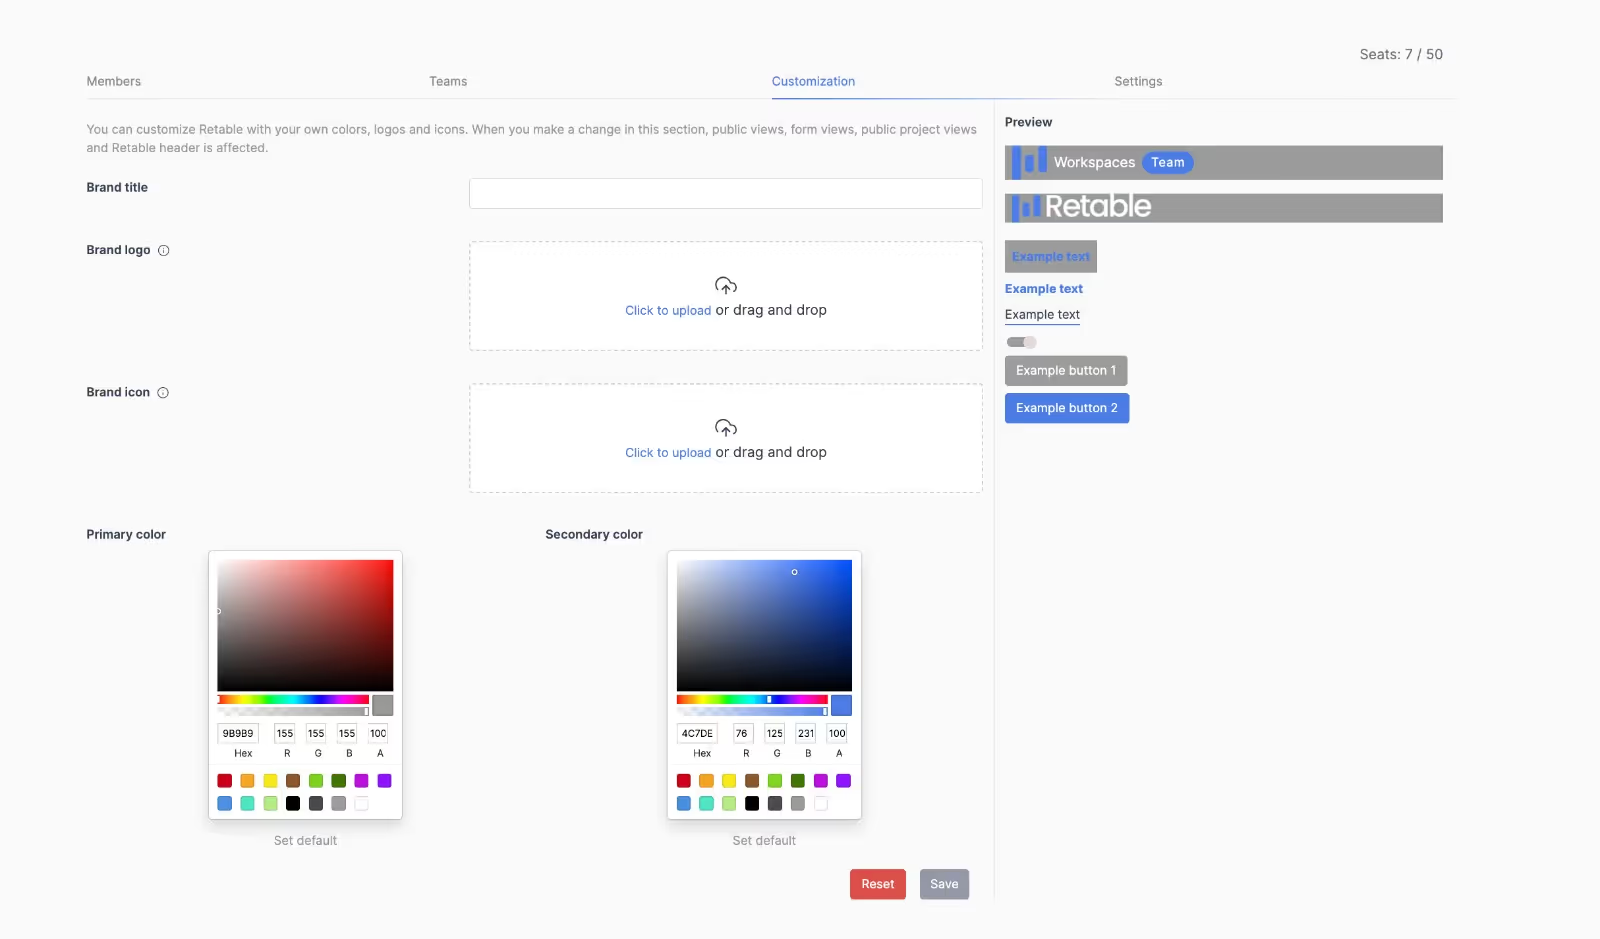
- Go to the "Customization" tab under your organization.
- In this area you can customize Retable with your own colors, logos and icons. When you make a change in this section, public views, form views, public project views and Retable header is affected
- Change your brand title, add your brand logo, brand icon, main and secondary colors
- You can preview the changes you have made in the preview panel on the right-side
After reviewing the previews, you can click the "Save" button to save your changes
Managing members and teams
There are various ways to organize members and teams in a Retable organization. You can check all role and team management settings below;
Adding a member to the organization:
- Navigate to the "Members" tab within your organization's settings.
- Click the "Invite user" button to start the process of adding new members.
- Input the email addresses of the individuals you wish to invite and assign a role to them by selecting either Lead or Member
- Hit the "Invite" button to send out the invitations.
Deleting a user from the organization:
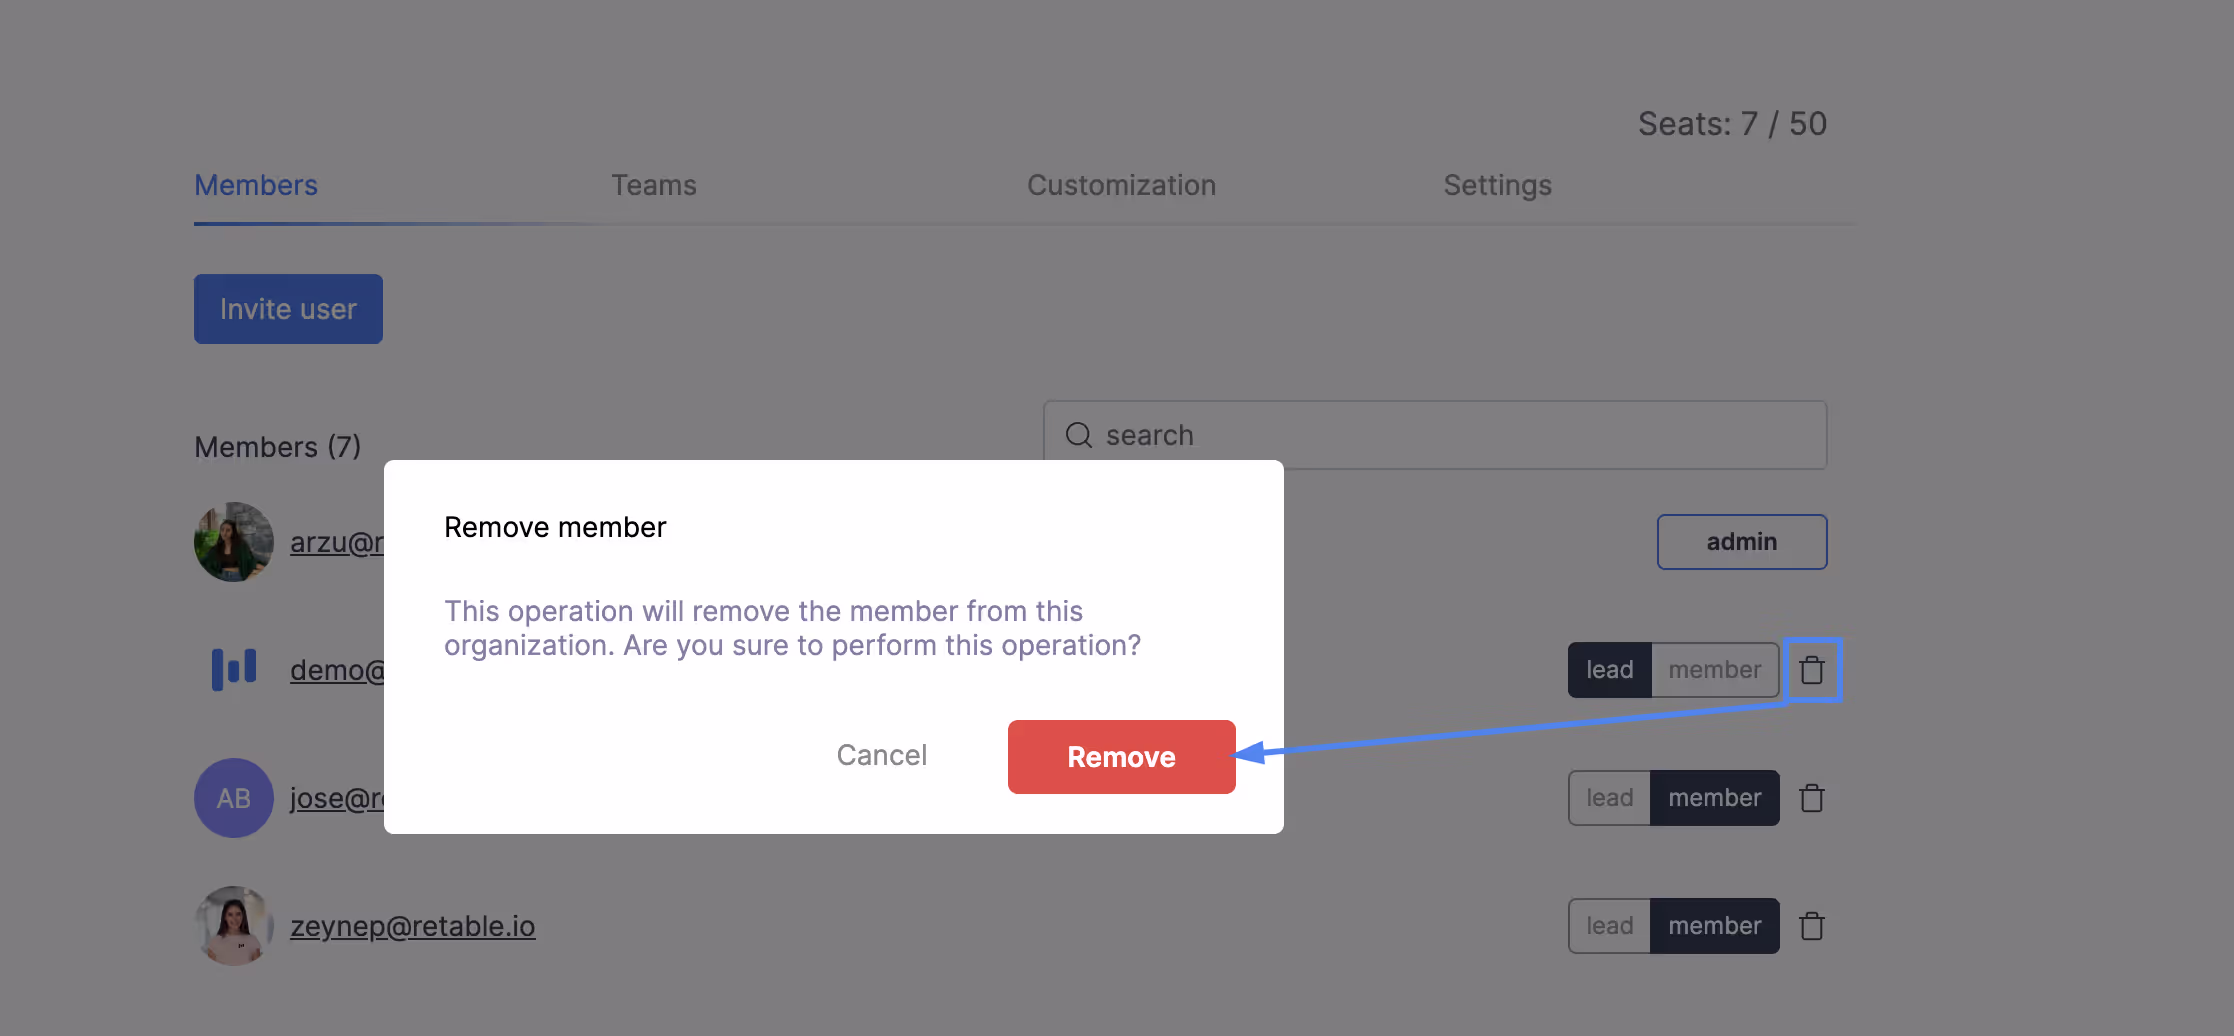
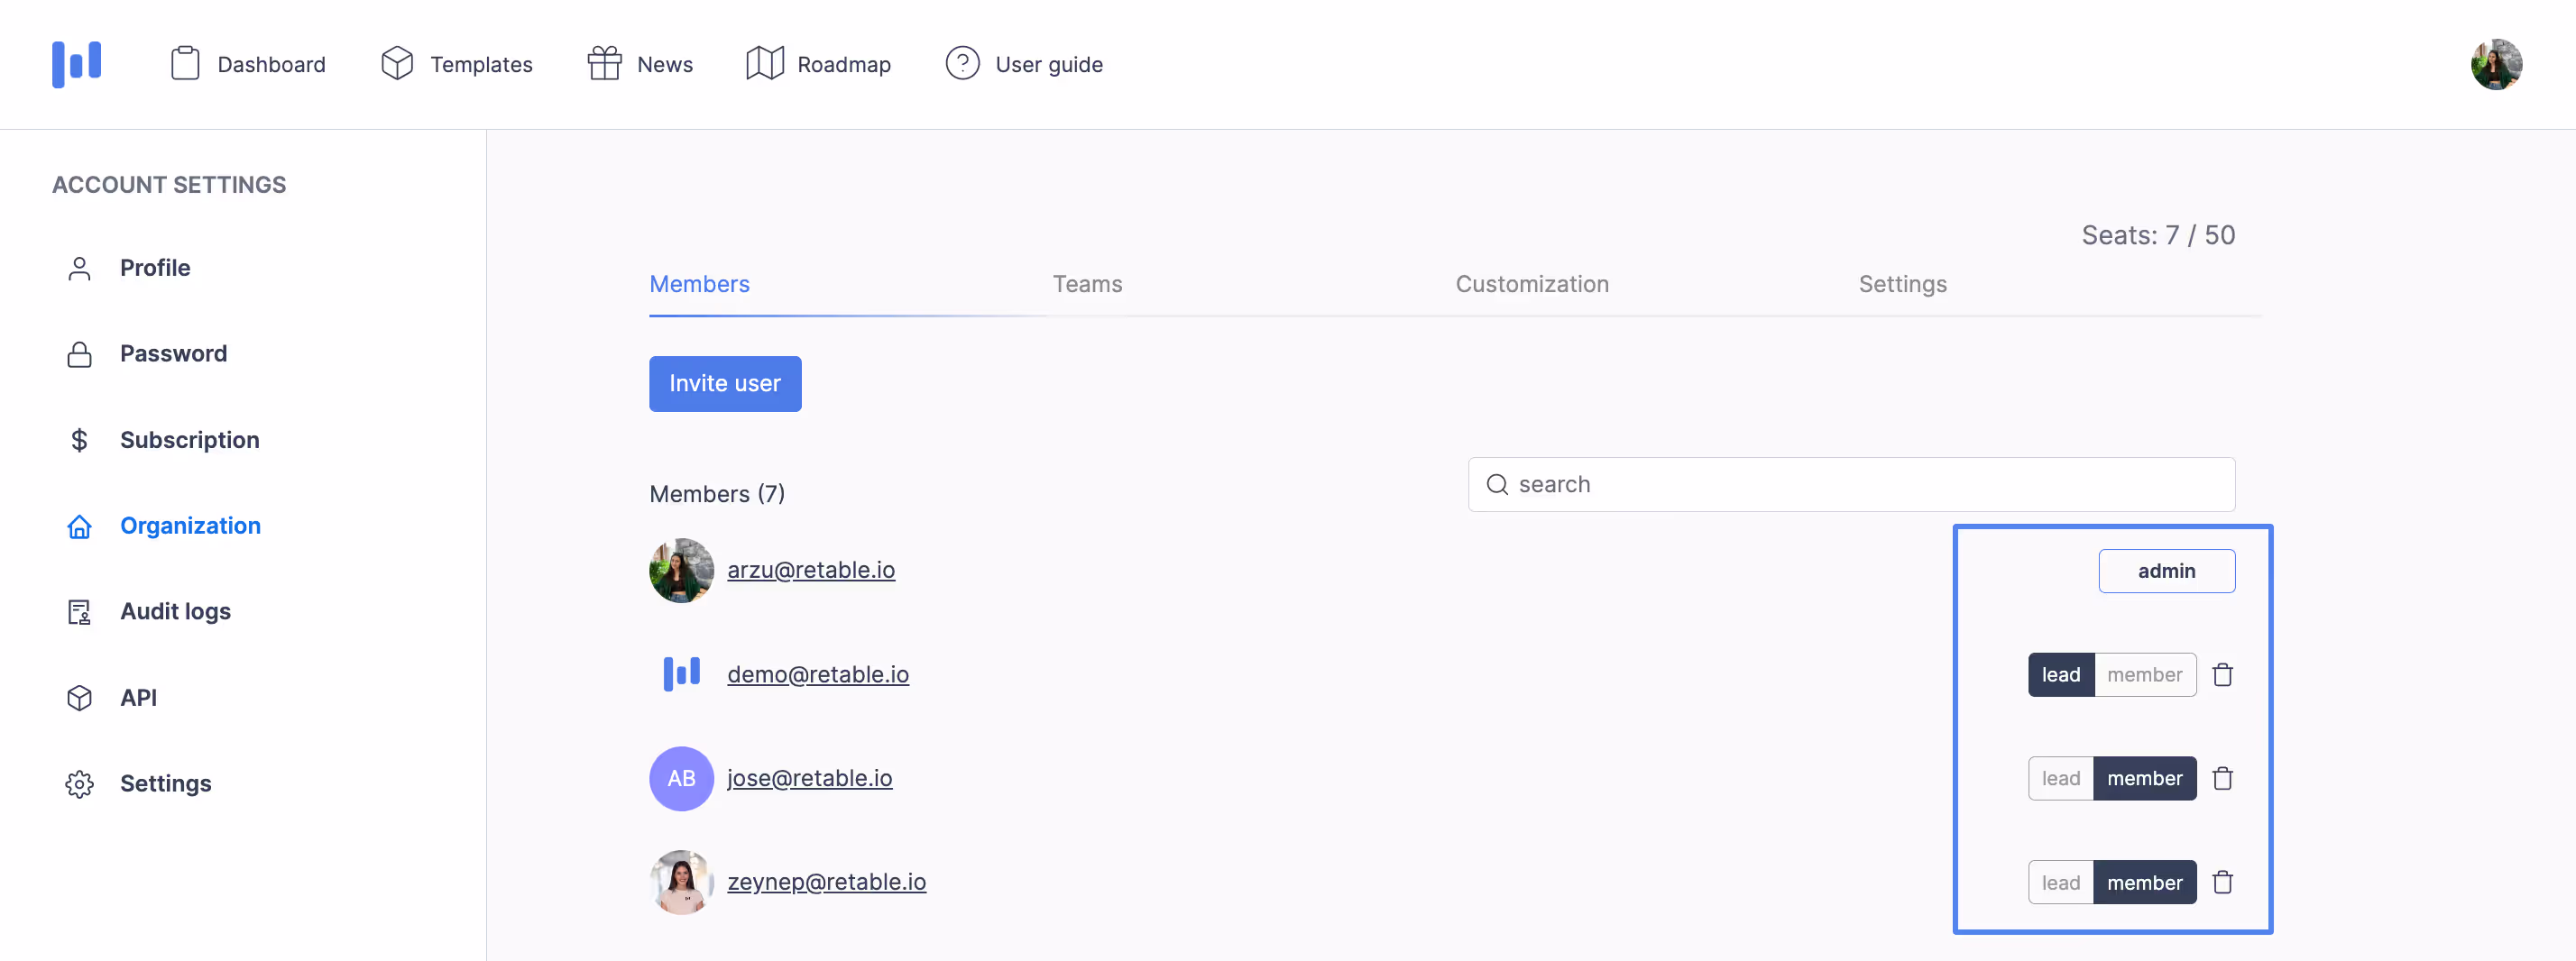
- In the "Members" tab, identify the member you wish to remove
- Click the trash can icon next to the member’s role to remove them from the organization
Creating a team:
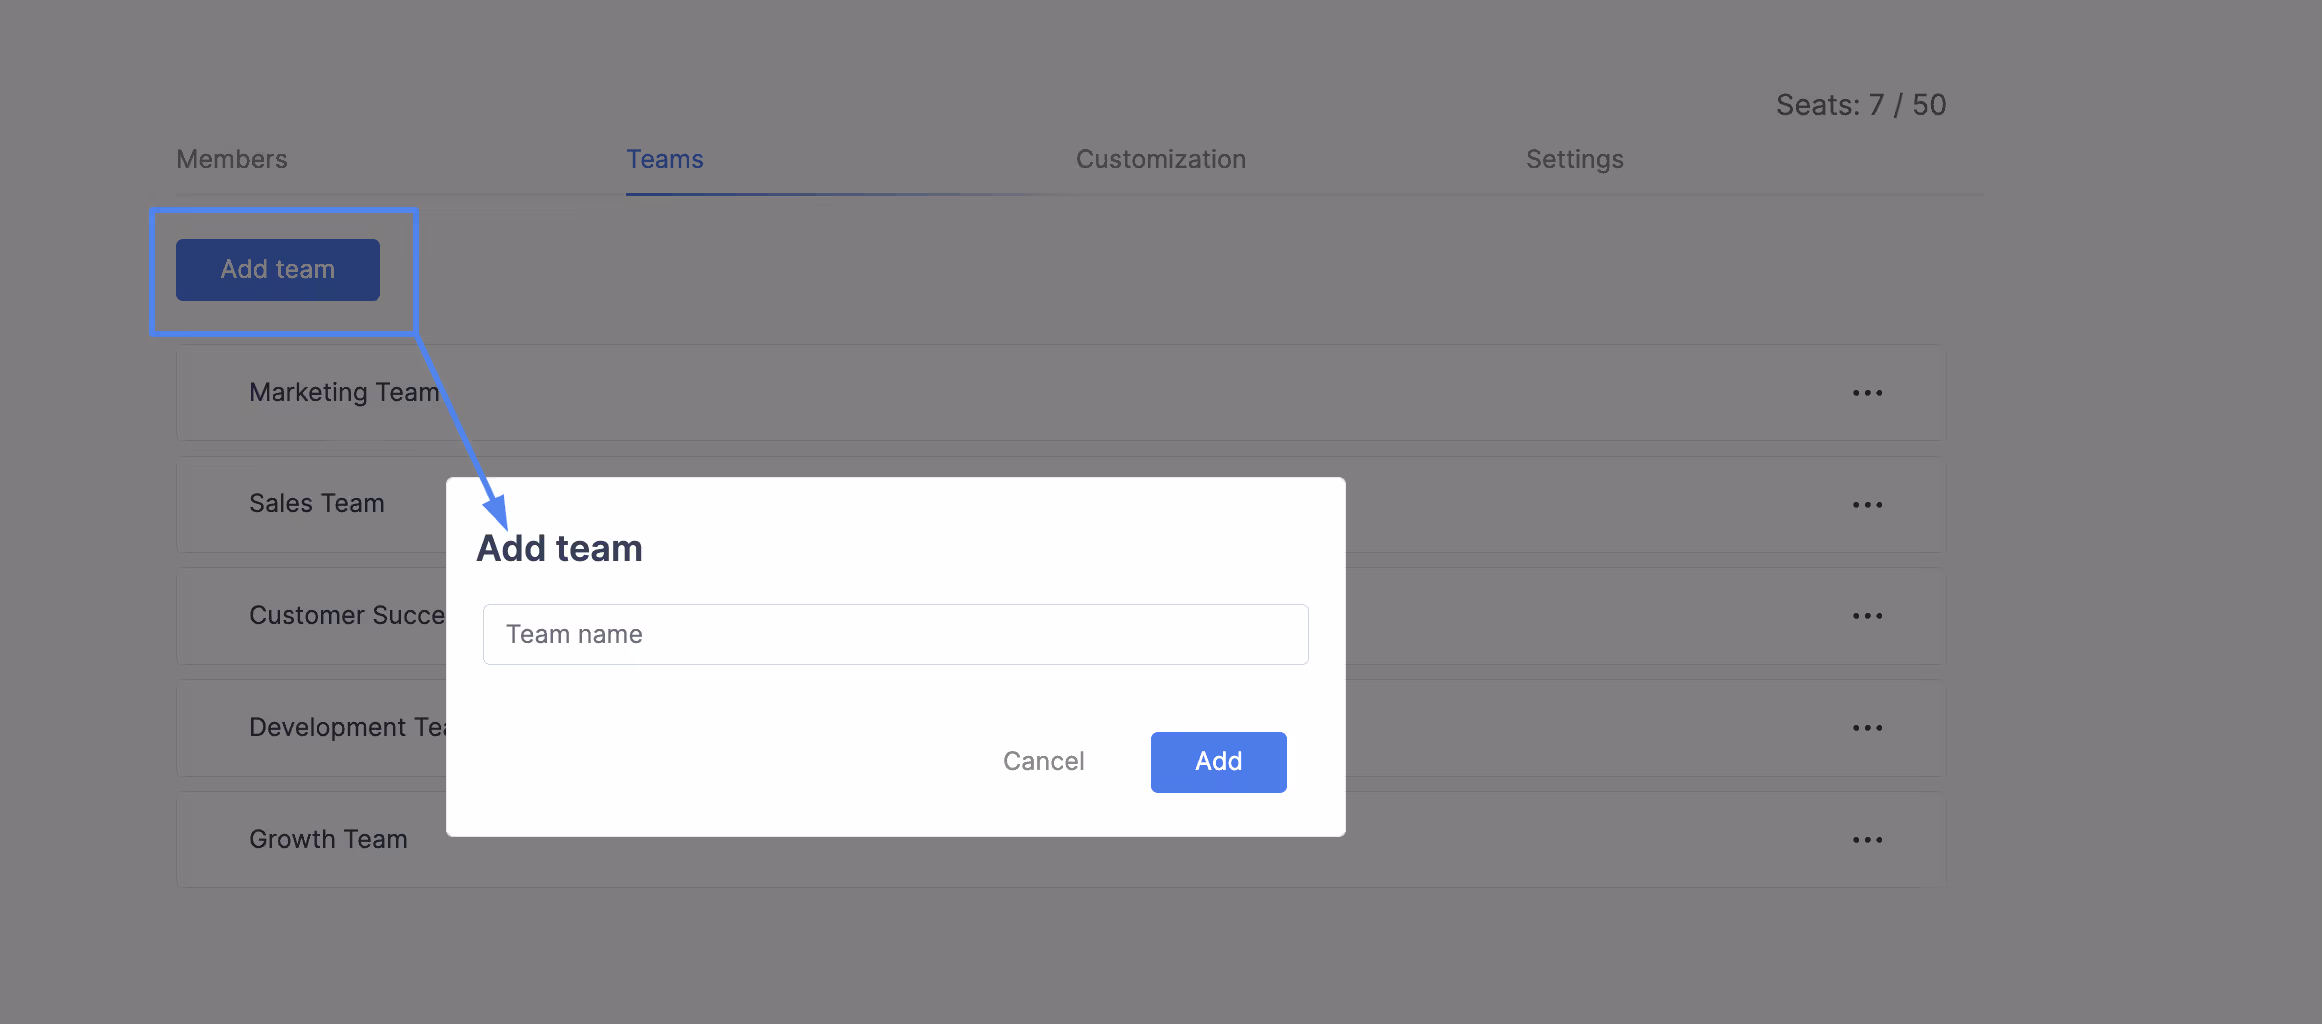
- Go to the team tab under your organization dashboard
- Enter a name for the team
- Optionally, assign a team lead to manage the team
- Invite members by selecting existing organization members
- Configure permissions and access levels for team members
- Confirm the setup to finalize the team creation
Adding members to a team:
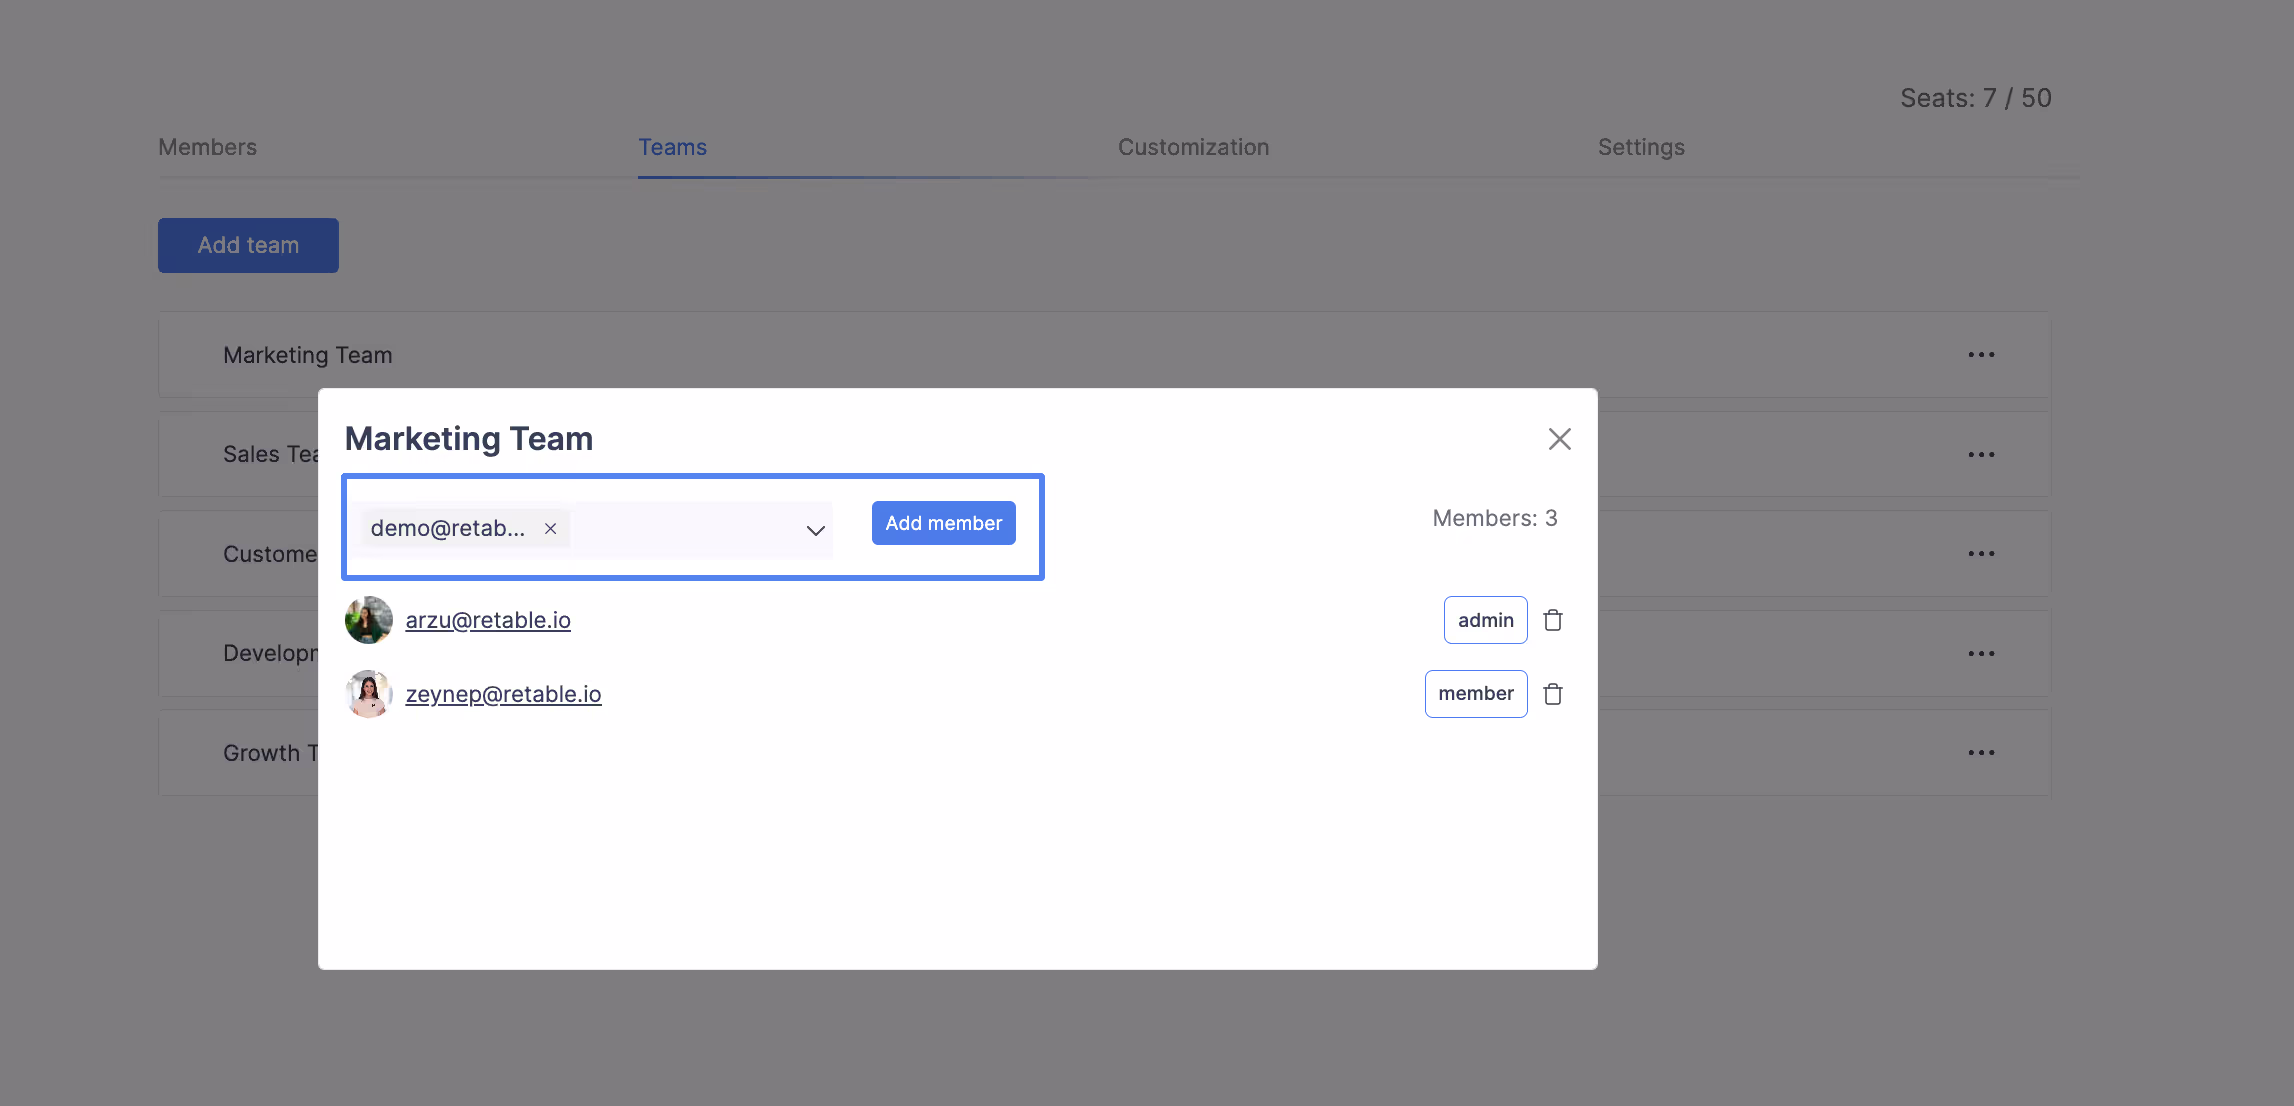
- Under the "Teams" tab, select the team you’d like to add members to.
- Use the "Select" field to choose members from your organization.
- Confirm the additions by clicking the "Add member" button.
Deleting a member from the team:
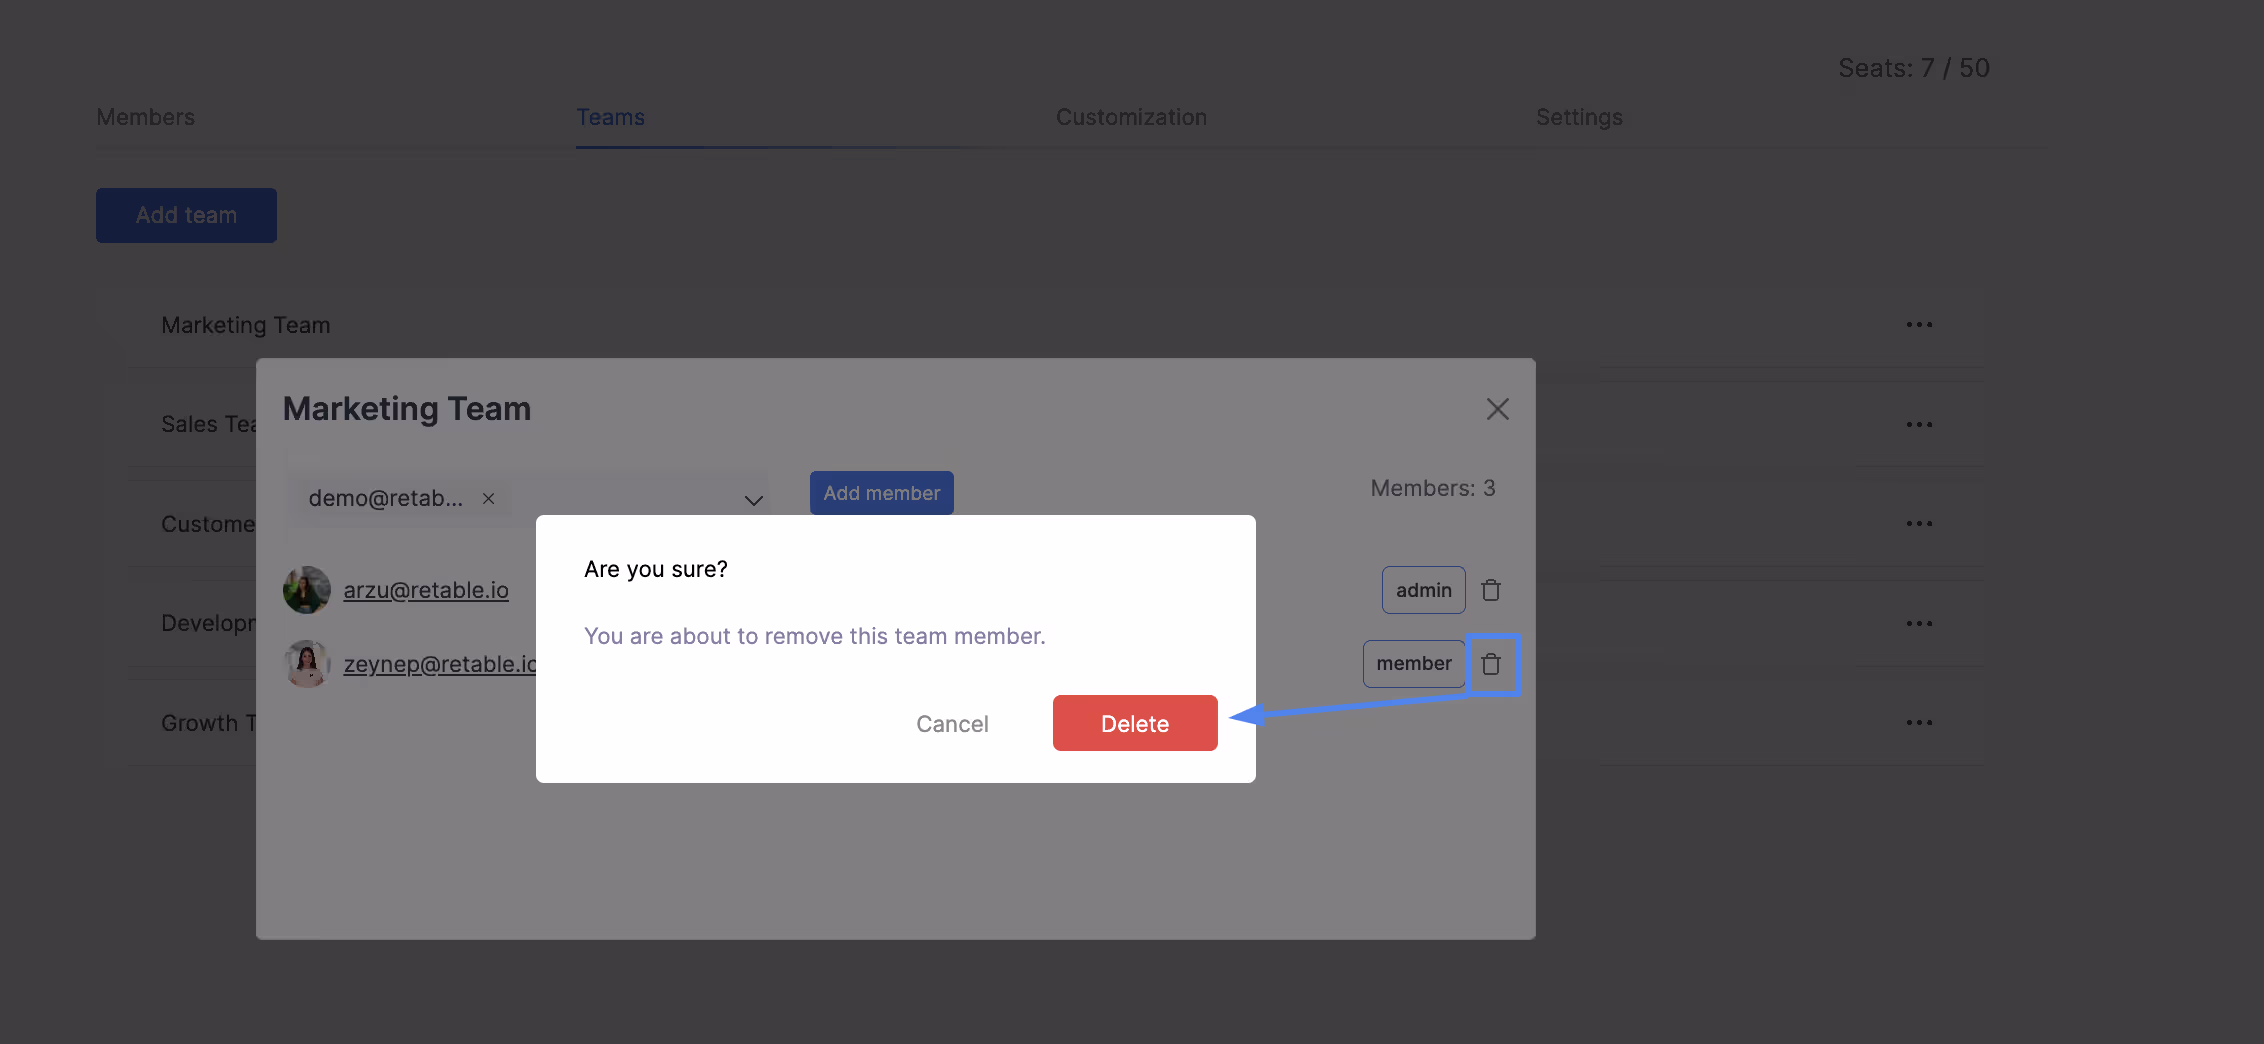
- Visit the “Teams” tab and find the specific team.
- Select “Detail” from the options, then remove a member by clicking the trash icon next to their name.
Colllaborating with your organization members and teams:
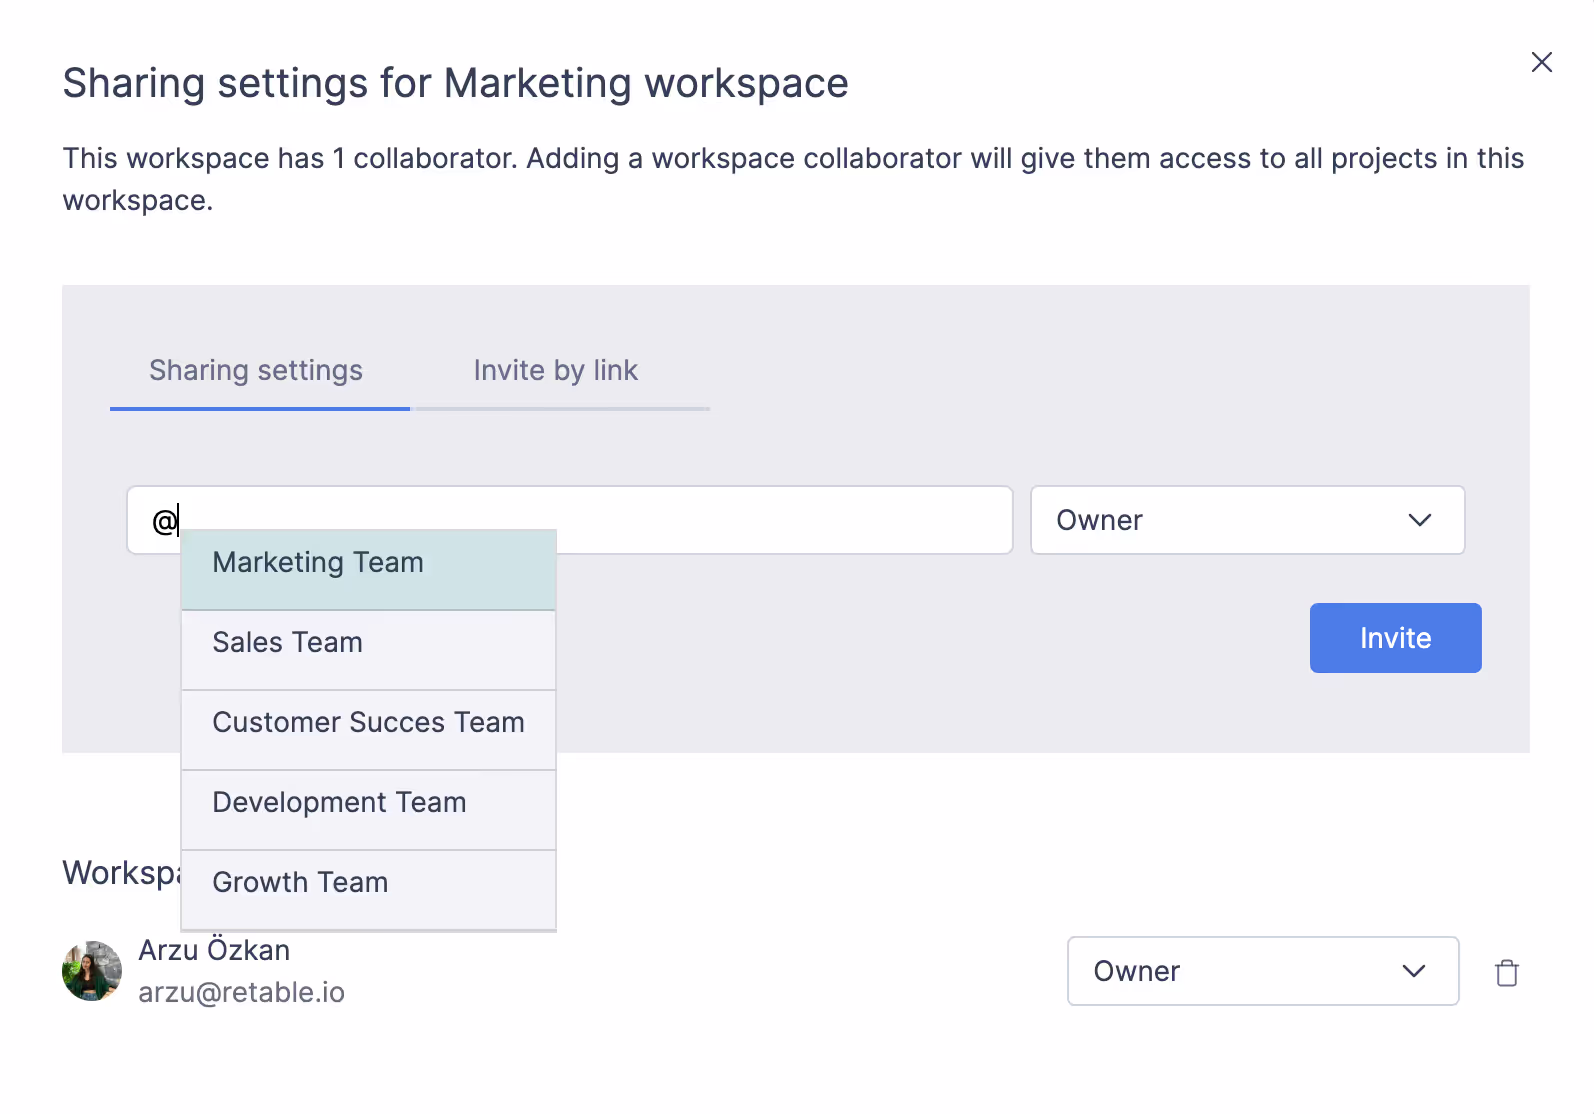
- Use the @teamname tag to share workspaces and projects with entire teams instead of individual members.
- This simplifies management, especially when members leave or join the team.
Organization and team settings
Team settings:

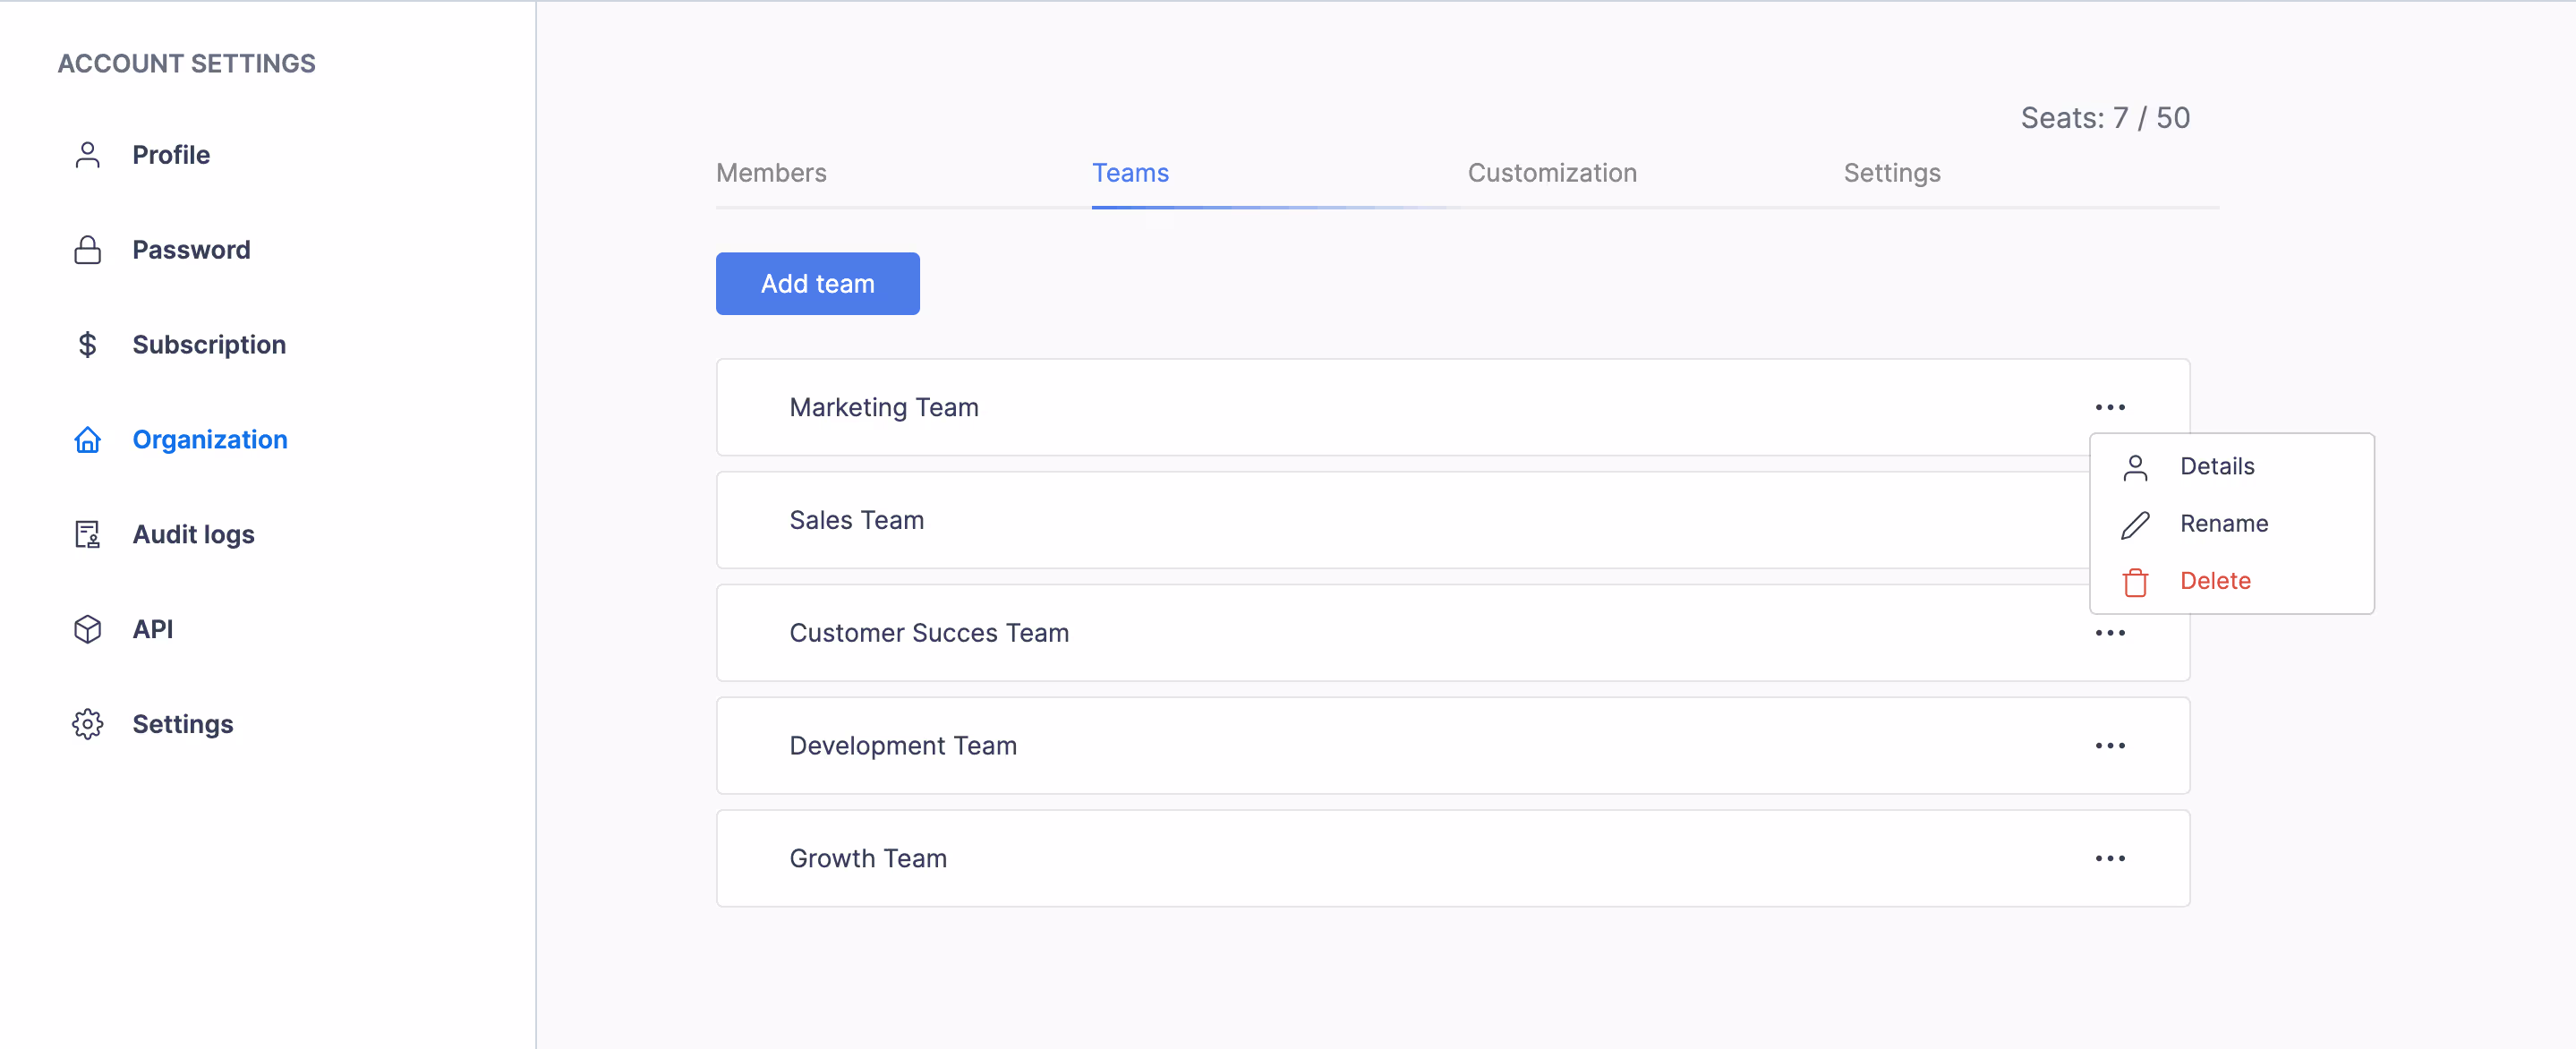
- Click on the “Teams” tab and select the three dots next to the team you wish to edit.
- Access various options such as team detail, renaming the team, and deleting a team based on your authority level.
- Add or remove members, rename the team, or delete the team entirely using the corresponding options.
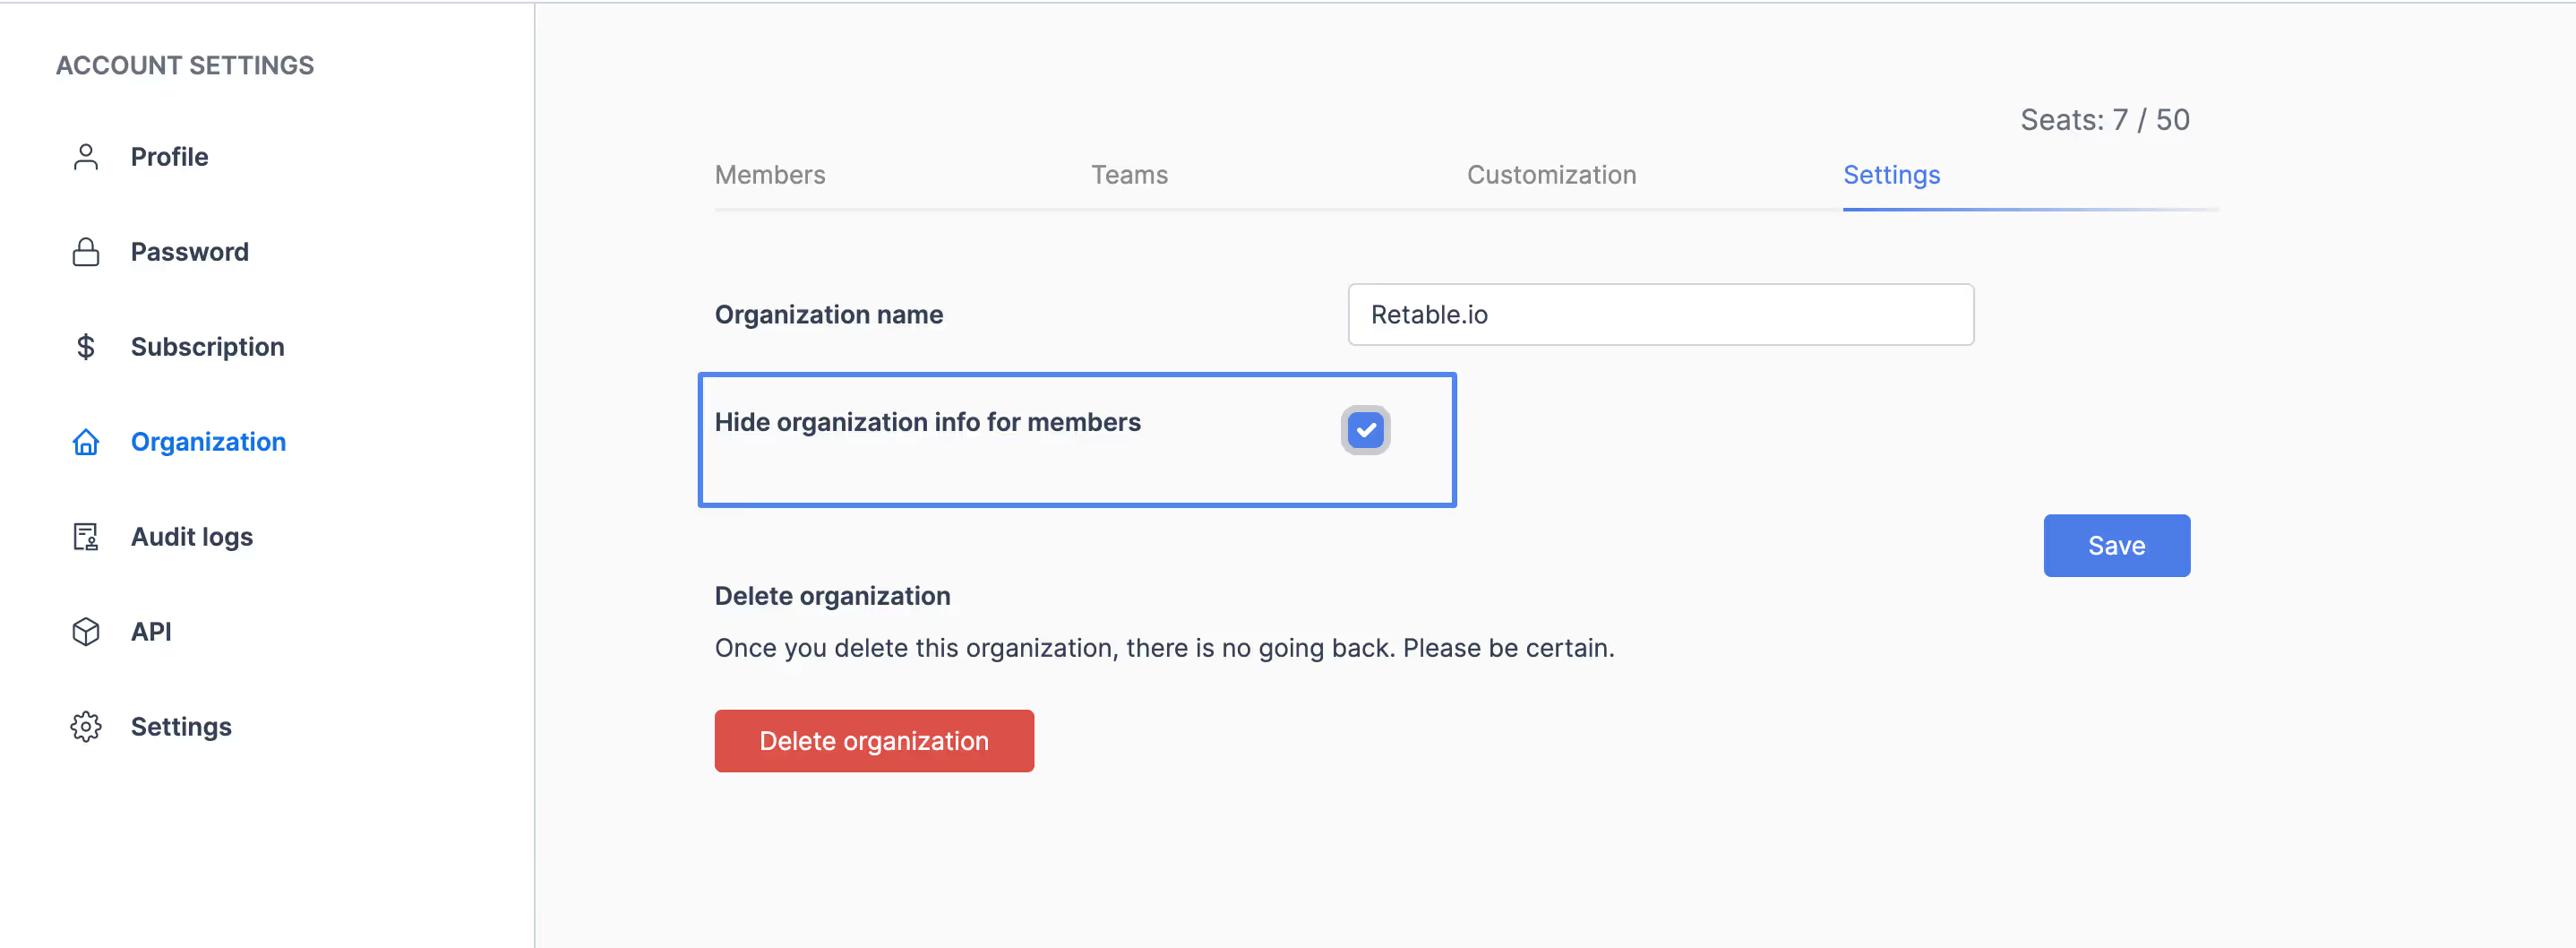
Organization settings:
- Billing and subscription:
- Manage your billing information and subscription plan by clicking the "Subscription" tab.
- Upgrade or downgrade your plan as needed or add more seats based on your needs.
- Security and privacy:
- Hide organization info for the organization members from the "Settings" tab under the organization dashboard
The person who creates the organization is the organization admin. Only the team admin can access all payment settings, including the subscription page. Adding a person to your organization means they don't have to pay for Retable, but it doesn't grant them access to all workspaces and projects. To collaborate, you need to invite them to specific workspaces and projects.
Mastering the management of organization members, teams, and roles is crucial for maintaining a well-structured and efficient working environment in Retable. By following these steps, you can ensure that every team member is positioned correctly, with clear responsibilities, and aligned with the collective goals of your organization. Stay organized, foster collaboration, and drive your projects to success with Retable’s organizational management features. 🚀
Enhance your Retable experience by signing up for free today and exploring the Retable Academy to access a variety of resources, including tutorials, guides, and tips, all crafted to help you master Retable's robust features and improve your data management skills.
more
Related Resources
.avif)
.avif)
.avif)
Create your smart data management solution
Plan, track, and analyse with your ease. Transform your data with an all-in-one platform, collaborate with your teammates.
Try for free!